The next-generation of monitor technology is upon us, quadrupling the number pixels our monitors can manifest and placing a heavy burden on our beleaguered video cards. What does it take to put together a 4K-ready gaming PC? Let’s find out with a little help from AMD.
I first reached out to AMD about the possibilities of exploring 4K monitor technology in late 2013. It had been nearly a decade since I’d laid hands on a system that didn’t have an Intel CPU and Nvidia graphics card of some sort in it — I’d been sticking to my comfort zone. But with more and more boutique PC makers turning to AMD’s Radeon R9 series of graphics cards and the company’s exciting Mantle technology hitting the scene, I felt it was time to see how the other half lived.
The initial idea was for me to try out a pre-built loaner system and monitor. Over the course of several conversations, we decided it would be more exciting to put together a new system from parts — something I’d not done since the last time I’d used a Radeon card, back before Advanced Micro Devices acquired Radeon-maker ATI Technologies in 2006. AMD would supply the bits, I’d pour my blood, sweat and tears into making it a gaming PC, and then they’d take the expensive hardware back. It sounded like fun. Good, clean, somewhat terrifying fun.
Before we get to the building process, let’s explore the catalyst (*cough*) for the entire project — 4K Ultra HD.
What Is 4K Ultra HD?
It’s really two terms mashed together. 4K is a term for display devices that feature a horizontal resolution around 4000 pixels. Ultra HD is a resolution of 3840 by 2160 pixels, which the television industry has adopted as its 4K standard. Ultra HD doubles the horizontal and vertical pixel density of 1080p, the HD standard we’ve spent the past decade or so building up to.
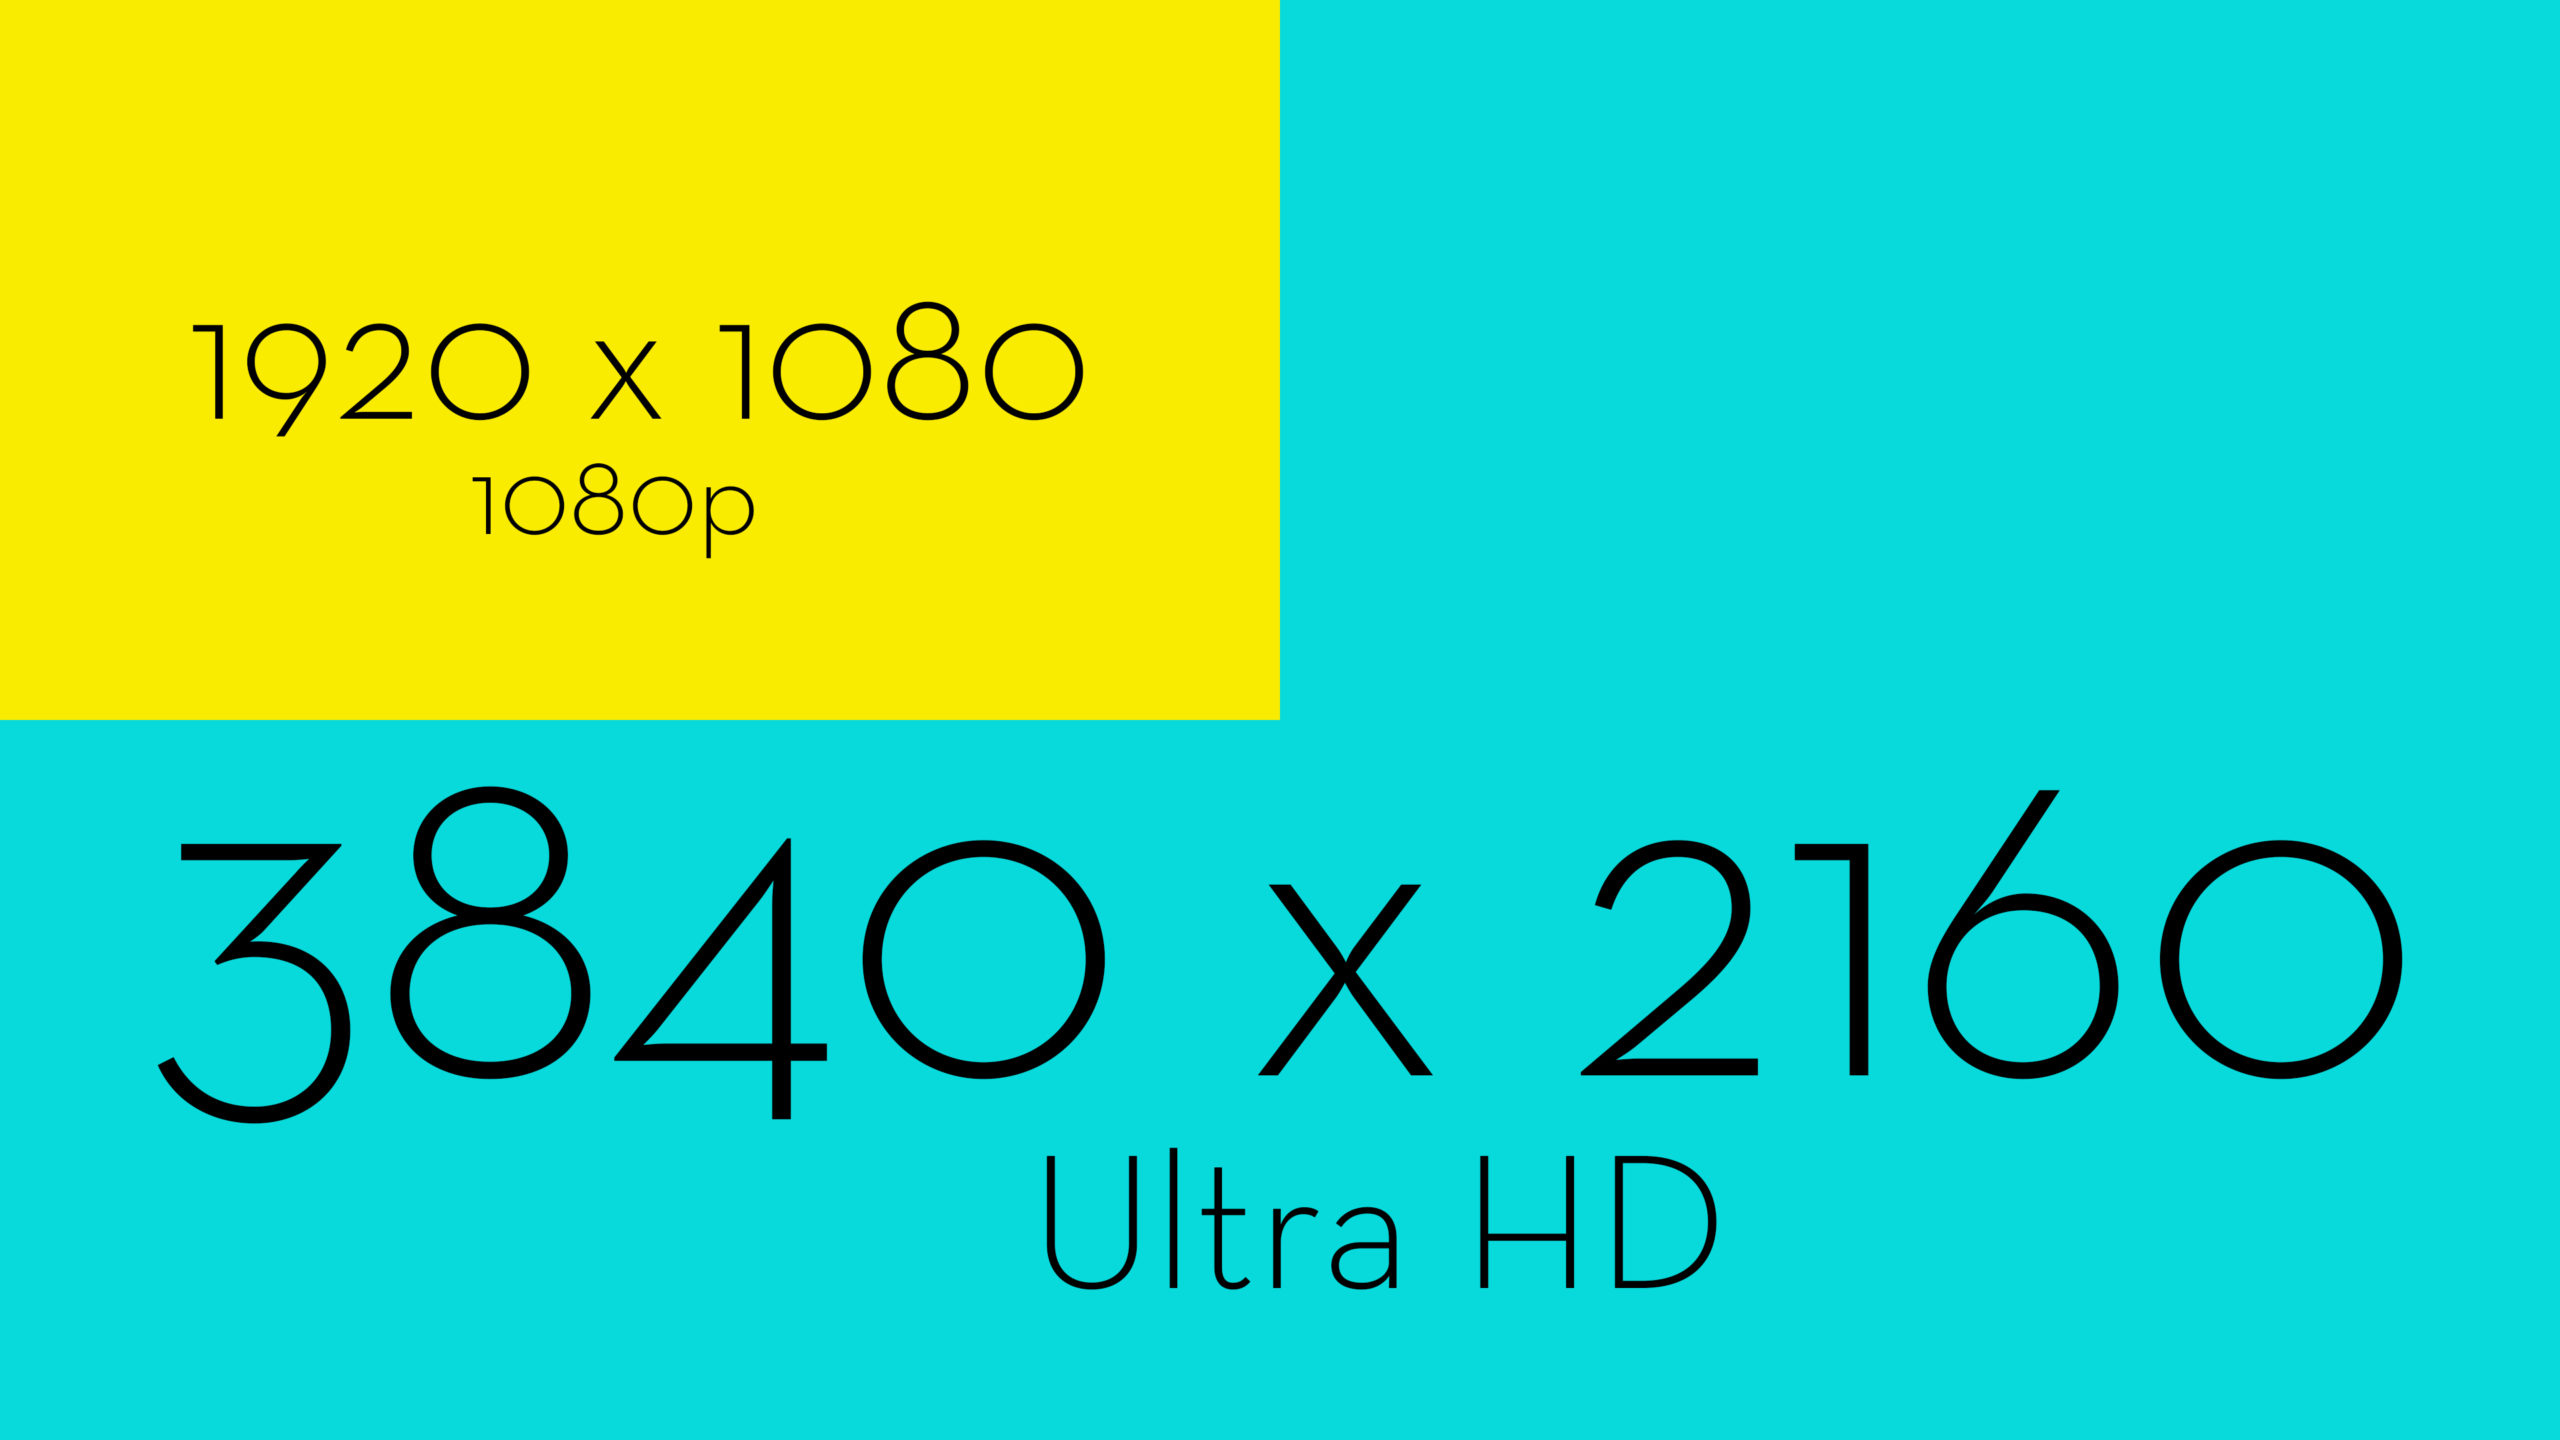
In layman’s terms, Ultra HD crams four times as many coloured dots in the same area as 1080p, making it much harder for the human eye to pick them out as individual dots. The result is a smoother, sharper image, with the ability to display finer details without them getting lost in a sea of tiny dots. The viewer can get closer to the screen without losing clarity.
For television viewers, Ultra HD will allow a larger television to be comfortably viewed in a smaller space. For PC gamers, hunched over their desks with one hand on the keyboard and the other on their trackball (trackballs forever!) or mouse, it means they can nap between sessions with their head against their monitor without worrying about eye strain.
Why Go 4K Now?
With the price of Ultra HD monitors still going through the roof, getting in on the ground floor means less chance of being hit by falling debris.
In all honesty, the only reason to make the jump to Ultra HD right now is if you have a substantial amount of cash to burn and a burning desire to stay on the cutting edge. There’s not a lot of video content for it out there yet. Plenty of PC games support the resolution, but many aren’t optimised for it, leading to issues like a big, beautiful Ultra HD game with tiny, 1080p-scaled menu elements.

It may be too early to spring for an expensive 4K monitor, but that doesn’t mean you can’t have a PC capable of playing nice with all of those pixels when the time to buy arises.
Do You Need To Build A New PC?
If you’ve got a gaming PC capable of playing most modern-day games at Ultra settings, there’s a good chance it will be able to handle an Ultra HD monitor. How well it handles an Ultra HD monitor will come down to your graphics hardware.
I wouldn’t expect frame rates on games this side of Tomb Raider or Bioshock Infinite to rise much above the 30s and 40s on Ultra settings on all but the most advanced graphics cards. That’s what I got with the stock Radeon R9 290x AMD provided. It took a second card to get into the 60s and 70s on a regular basis. When all else fails, add another video card.
On the other hand, building a new gaming PC from parts is a really enjoyable way to spend the afternoon, depending on your anxiety level. Time to put together ours.
Gathering The Parts
The techie equivalent of an action movie arsenal assembly sequence (complete with tying a bandana about one’s forehead), choosing which components go inside of your new gaming rig is an intensely personal thing. I let AMD do it. I respect the sanctity of the selection process, but I also know myself far too well. Left to my own device selection, I’d still be hemming and hawing over which bits to put in right now, and I started this project late last year. I am not good with tech commitment.
Here’s what we initially wound up with. I’ll go over each component for those of you frightened of video.
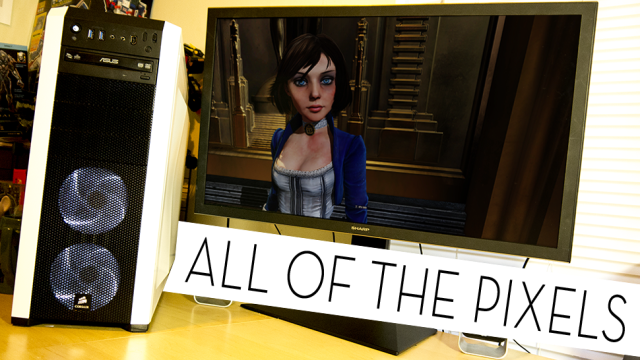
The Monitor — Sharp 32″ PN-K321

Remember the good old days, when the most expensive component of any PC build was the monitor? Welcome back to the good old days! There are less expensive 4K monitors and televisions than the $US3,000 Sharp PN-K321, but many of them harbor a terrible secret. They advertise a 120Hz refresh rate, but for most of them that only applies to 1080p resolution — at Ultra HD it drops to 30Hz. The Sharp PN-K321 will run at 60Hz in Ultra HD, though it requires a DisplayPort connection and some menu trickery to make it work.
All-in-all it’s a gorgeous, versatile monitor. You can jack it up on its stand, giving the messy-desk gamer plenty of space for empty cans and food wrappers. You can turn it vertical in case you want to hook up your iPhone and play Cut-the-Rope. It swivels. I like a good swivel. No wonder AMD can’t wait for me to ship this back.
The one downside is the monitor’s 8ms response time. That’s going to cause some ghosting, and for many PC gamers would be considered a deal-breaker. I see it as an indication that we’ve got a long way to go before Ultra HD monitors are both affordable and practical for gaming.
The Enclosure — DIYPC Alpha GT3
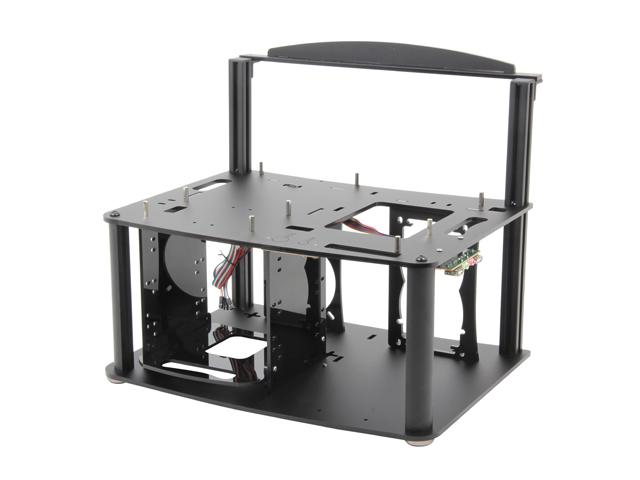
That’s right, we’re going open bench with this mother! Nothing beats an open bench system for component testing and accessibility. Everything is right where you want it, and it looks so damn cool. Also it has no place to mount the CPU water cooler, so we’re not using that.
The Real Enclosure — Corsair Carbide Series 500R
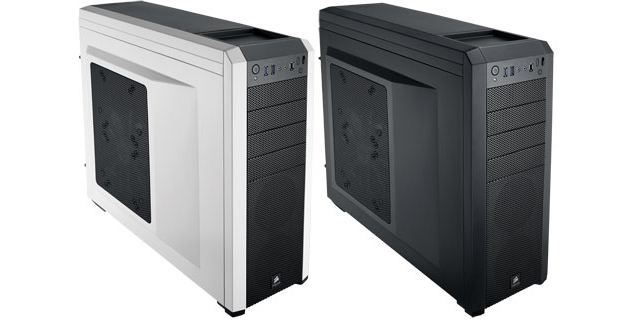
Sexy but not obnoxious, convenient and versatile, the Corsair Carbide 500R (in Arctic White) immediately caught my eye as I was browsing cases to replace my ill-fated attempt at being all clever. There’s plenty of room inside for hard drives, optical drives and novelty cupholders, and the bays are all tool-less, which made the build a little easier. Plus the 500R was designed specifically to house the CPU water cooling unit I was using — ok, that’s the main reason we chose it.
Motherboard — ASUS Sabertooth 990FX R2
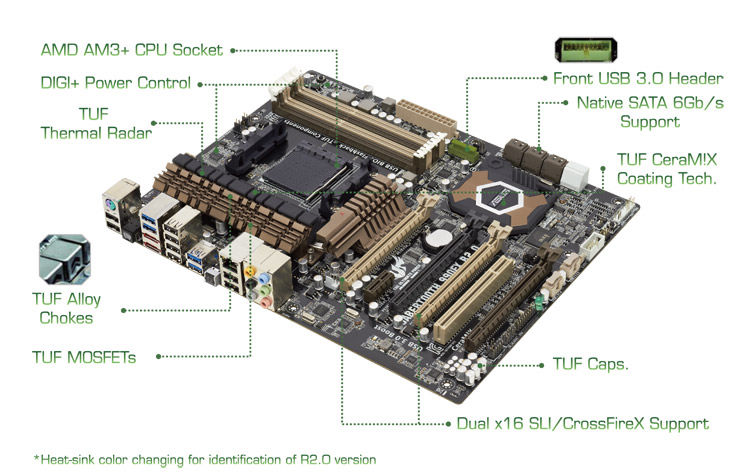
One of the most handsomely rugged motherboards I’ve handled, the Sabertooth 990 FX is assembled from military grade materials, which means I can touch it without it instantly bursting into flame. The board packs in a lot of nifty features, including the ability to flash the BIOS using nothing but a memory stick and the power supply, and the magical MemOK! button, which somehow resolves memory issues preventing booting via dark ritual.
Processor — AMD FX-9590 4.7GHz
No, you can’t have a picture of this, it’s just a thin metal square. A very fast thin metal square, with eight CPU cores running at 4.7Ghz base and 5Ghz turbo. I’m feeling like such an old man right now. It runs very hot (hence the next bit) and only runs on a select few motherboards, but it’s the fastest thing AMD has going, and it’s pretty impressive.
Fun Fact: A week after the motherboard arrived, I sent an email asking when the processor would arrive. “It’s mounted on the motherboard,” came the reply. Never skip the important opening the box and looking at things step of computer assembly, kids.
CPU Cooler — Corsair Hydro Series H90
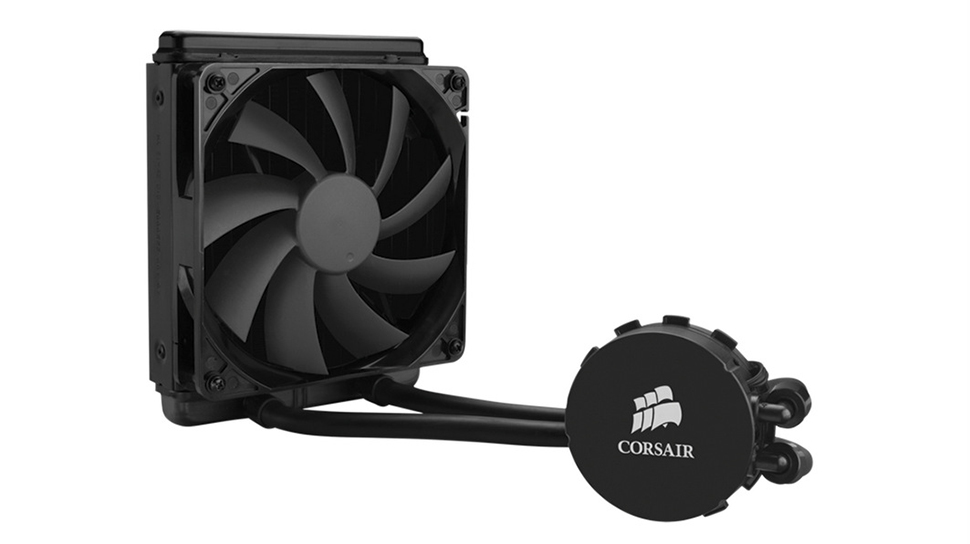
The FX-9590 needs cooling, and Corsair’s H90 provides it. Part of Corsair’s Hydro Series of liquid CPU coolers, the R90 was specifically built to be a giant pain in the arse because of its 140mm radiator and fan. It fit the case just fine, but a 120mm would have fit much better. At tames the FX-9590 beast at least, so I’ll let it live.
Video Card — AMD Radeon R9 290X
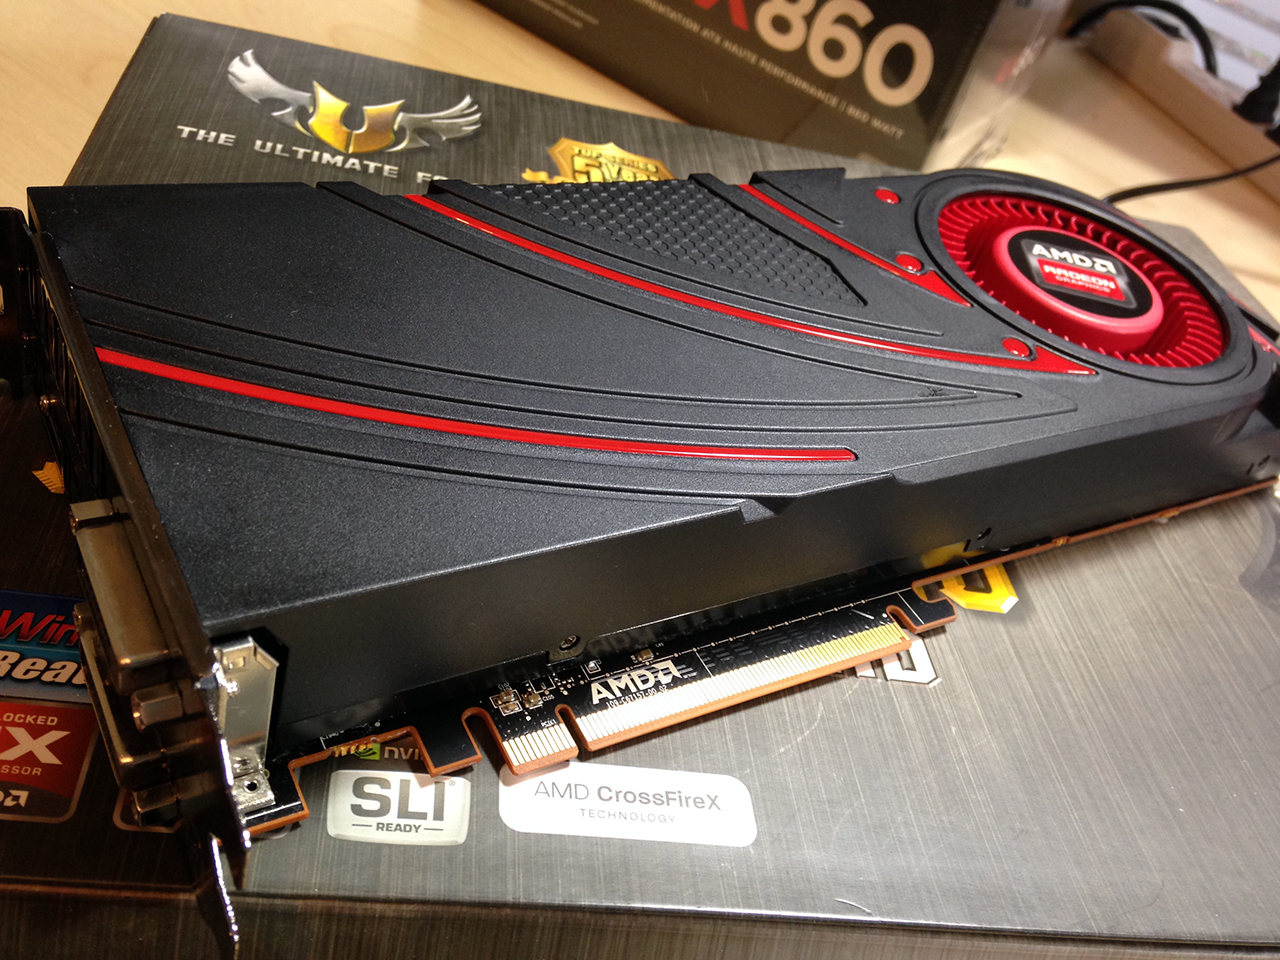
Back when I first started this project — before the announcement of the water-cooled R9 295X2 — the Radeon 290X was the top of its line, the equivalent of the Nvidia Titan, only much more affordable. It runs a bit hot, but it runs hot without killing itself, which makes all the difference. AMD sent along its reference card, which is what third-party companies take and deck out with much better cooling. It runs games at Ultra HD resolution, which is exactly what I was going for.
Memory – AMD Radeon Gamer Series 16GB DDR3 2133

Man, AMD is really into AMD products, aren’t they? Fast, reliable, and ready for overclocking once I’m done with this article and can risk screwing stuff up.
Power Supply — Corsair AX 860
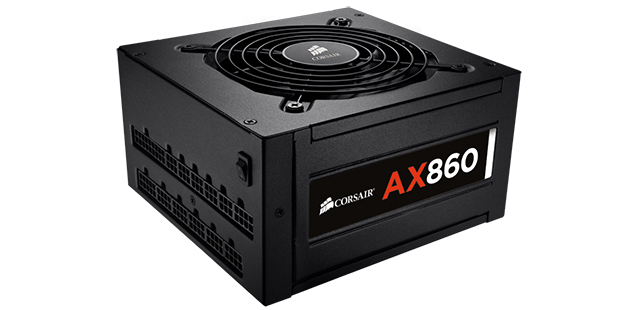
Powerful enough to handle several video cards, while efficient enough to handle light loads without the fan even running, the AX 860 is a fine power distribution device. It’s completely modular, and comes with a set of stealthy black wires, perfect for those of us who are horrible with cable management.
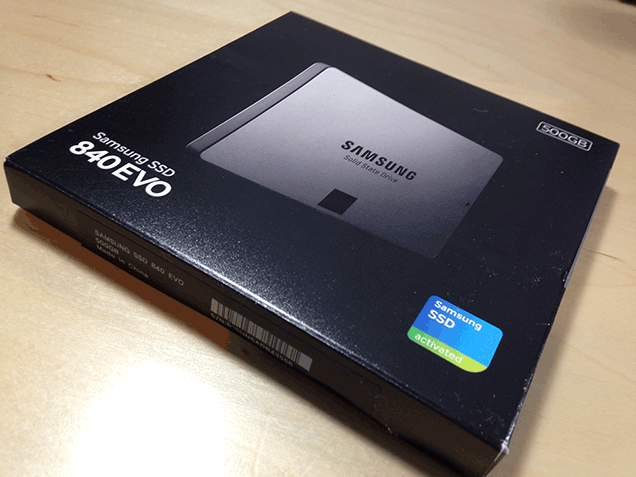
Storage — Samsung 840 Evo 500GB SSD
I’ve been a big fan of Samsung’s solid state drives since they have been a going concern, but this probably isn’t the direction I would have gone had storage been up to me. For one, 500GB of space just isn’t enough for all the games I need to have installed at once, even if I never play them. Is that completely irrational? Yes. Yes it is.
I’d probably have gone with a smaller, 128GB SSD to house system files, and a beefy SATA drive for storage. I could just add a SATA to this system, but then I’d feel bad about wasting 500GB on a Windows install. We’ll stick to AMD’s plan — for now.
Optical Drive — A Cheap-Arse DVD Drive I Picked Up At Fry’s
It reads DVDs! Might even write them. Who knows?
Putting It All Together
Now comes the fun part — assembly. For many it’s the most rewarding part of a new PC build, the same way a baker loves combining ingredients to create a cake capable of running Crysis 3. For others it’s a parade of opportunities to destroy the expensive components they have gathered together. I fall somewhere in the middle, largely because the first motherboard I laid my hands on professionally went up in a puff of smoke, resulting in me never being asked to cover for Digital Equipment Corporation’s repair department ever again.
That sort of mishap can easily be avoided by following these simple safety tips.
1. Always wear gloves while working with PC components. You should probably wear them all the time, just in case. One of the components of the machine I was building provided me with a pair.

2. Have much smaller hands than I do. This is statistically pretty easy.
3. Do not assemble your computer on a carpeted floor. Stick to wood, tile or stone. Or use a desk. Yeah, a desk is good.
4. Tap the power supply to ground yourself before touching components. I’m pretty sure this doesn’t really do anything, but someone told me to do it 22 years ago, and I’ve been doing it ever since.
5. Buy a pre-built computer. The only way to be completely sure you aren’t ruining anything is to not build your own computer.
Now that the safety lesson is out of the way, let’s build a computer.
Step One: Mount the motherboard. My least favourite task in building my own PC, thanks to past tragedies and my near-supernatural talent for putting the screws in the wrong holes. This should be the easiest thing ever — a handful of screws with well-marked mounting points. Somehow I always mess it up. This time I screwed in posts first, which it turns out I did not need. Eventually I got it in ok.
Step Two: Affix the CPU cooler. This of course assumes that your processor was already mounted on your motherboard before you mounted it. If not, maybe go do that.

The H90 install was as easy as I was nervous about it. I just had to remove the stock cooler clips from the motherboard (via a convenient cut-out on the enclosure’s base plate), replace them with the cooler’s mounting hardware, line it up with the holes on the mount and screw it into place.
The tubes run to a 140mm radiator, with a matching fan on top. The hardest part of the process was finding a mounting point in a case favouring 120mm devices. The system hasn’t exploded yet, so I think I’m fine.
Step Three: Slot the memory. It just pops in, really hard to mess up. Savvy readers will notice I have my two sticks in the wrong slots in the motherboard video above. I caught it, eventually.
Step Four: Plug in the fans. For those of you that choose an enclosure that doesn’t come with four fans already mounted to the front, back and side, consider this step four-point-five. Either way, plug these little buggers in now, before there’s no longer room for your giant fingers to navigate.
Step Five: Connect the front panel wires. Another set of tiny wires requiring plenty of room for hands to get in close.
These wires enable devices on the front of the PC, such as USB ports, audio jacks, hard drive indicators and the ability to power on your computer. Connecting these early affords ample opportunity to accidentally dislodge them while inserting other components, which makes PC building fun.
Step Six: Install all the drives. At this point I put the SSD and cheap-arse DVD drive into play. For the SSD I had to pull out a removable drive tray and secure the drive to it with screws. The cheap-arse DVD drive went in much easier.
Connect the SATA cables to the motherboard and drives, and you’re ready to continue on for several more steps!
Step Seven: Plug in video cards, sound cards, capture cards, Magic cards. Now would be a good time to get all of your PCIe cards plugged in, before your system becomes an impenetrable jungle of power cables. I love plugging in PCIe cards. It makes me feel like I’m playing with the world’s most ridiculous Nintendo Entertainment System. Sometimes I blow on the slots before inserting them. That’s not recommended. Plug any smaller cards you might have in first, saving the massive, cumbersome video card for last.
Step Eight: The power supply. Want to make installing a power supply easy? Keep it outside of the enclosure as you connect cables from it to the motherboard, PCIe cards and drives, using only the modular plugs you need. Once that’s done, slip the unit into the system and screw it down. Seems so much simpler than the way I did it. Remember to manage your cables.
Step Nine: Close the patient. Everything should be inside at this point. If you have leftover parts, save them for the computer you build after this one explodes. Close the case, plug in the power cable, monitor, network cable, keyboard and mouse. Maybe say a little prayer now, or save it til the morning after — your choice. If all goes well…
Can you see how many of my own steps I skipped in that video?
Once the computer is powering up, the rest is quick and easy. Installing your operating system, finding the correct drivers, finding the really correct drivers and completely configuring the software side of things to your liking shouldn’t take much more than a week and a half. After that, it’s a gaming PC!
The Ultra HD Experience
Upon loading the graphics card drivers and setting the monitor resolution to 3840 x 2160, I was immediately struck by how desperately I need a new pair of glasses. Having spent the better part of a decade at 1920 x 1080, suddenly having four times that in an area only slightly bigger than my regular office monitor was surprising and squinty.
It looks like this:

For the full effect, open that image in a new tab. Massive, isn’t it? Only it isn’t. Everything is tiny. Everything is small when you’re Ultra HD. Sing along if you know the words. It’s a ridiculous amount of screen real estate to play with. I also had to set my mouse’s dots-per-inch to its highest setting, so it didn’t take half a day to traverse the monitor.
For us older folks and those with shaky eyesight, there are two ways to deal with an Ultra HD Windows desktop. Either set the default resolution lower and save Ultra HD for games, or get really, really close to your monitor.
I’m not joking. Lean in close to your standard 1920 x 1080 monitor. A six inches away, the space between pixels might as well be waving a giant “I’m the Space Between Pixels!” sign. Six inches from Sharp’s Ultra HD monitor, all I see are graphics and letters. Incredibly sharp graphics and letters.
It’s like the difference between an iPad 2 and an iPad 4 with Retina display. If you’re used to a 2, and someone hands you a 4 to look at, your instinct is to stab them in the eyes with your stupid old tablet and run away with theirs. This loaner monitor makes me want to stab AMD in the face. It’s a good thing.
Gaming in Ultra HD
There’s not as much squinting involved, but you’ll still want to get up close to your monitor when playing a game — that’s where the magic happens. Where normally you’d start to see the image begin to break down, instead you’re experiencing a level of detail not possible with a lower resolution screen.

Again, right click and open this screenshot of Tomb Raider running at 3840 x 2160 in a new tab, and then zoom in. Pan around, soak it all in. I’ve never appreciated texture work as much as I do playing a game running at Ultra HD resolution.
But there’s a downside as well. Check out this shot of LEGO Marvel Super Heroes.

Again, amazing details, but I’m also picking up on some flaws I wouldn’t have noticed before. Why is the road paint texture crawling up the back of Hulk’s foot? Is that character picture in the top left hand corner really that grainy?
The same way the first round of HDTVs alerted us to the fact that actors have pores, Ultra HD might uncover tiny blemishes in our games we might have missed otherwise. As adaptation of the new standard increases, I’m sure we’ll see less and less of our games’ greasy pores.
For the most part, the games I tested on the completed system looked just lovely in Ultra HD, but how did they play?
Performance
As soon as I verified the PC I built was not in immediate danger of melting, I installed Steam and began downloading BioShock Infinite, my current go-to benchmarking tool. I’m always happy to see Elizabeth, no matter how many frames per second she appears. Within the hour, there she was. You should probably enlarge this one. It’s kind of breathtaking.

Breathtaking, but only running just north of 30 frames per second on Ultra settings. For many people, that’s not a problem — 30 frames per second is respectable. I’m sure someone who had just paid $US3,000 for a monitor capable of running at 60Hz would be fine with Vsync locking everything at 30 because it can’t even get close to 60.
I tried a couple more titles — Batman: Arkham Origins, Tomb Raider — both benchmarking in the high 30’s. It was at this point I turned completely stupid. I got in touch with the AMD tech I’d been communicating with and voiced my concerns over the low frame rates. I was worried I had done something wrong, maybe messed up a setting or something.
With incredible patience and without laughing once, he explained that the graphics card was now responsible for four times the image it would have been at 1920 x 1080, so the frame rate would logically be a fraction of what it would be at the lower resolution. I was a man who had suddenly grown four times his size, wondering why the same meal I’d eaten the night before wasn’t as filling.
He offered me two possible solutions. I could run the games at less than optimal settings, or he could loan me a pair of these:
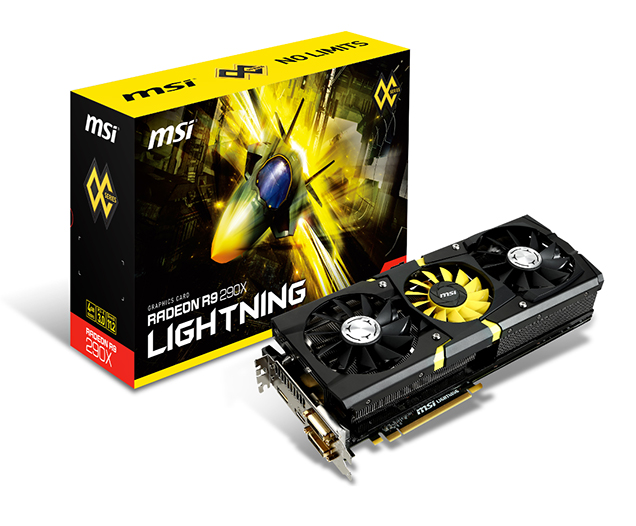
At nearly twice the height of a standard high-end graphics card and weighing in at three and a half pounds, the $US799 MSI Lightning Radeon R9 290X beats the living hell out of any heat issues AMD’s reference card may have had. In their review, Tom’s Hardware called it “the Radeon R9 290X done right.” If you were facing off against the R9 290X in a boss fight, this would be its final form.
After careful consideration, I opted for the incredibly impressive graphics cards. Even the packaging was impressive (image via Tom’s Hardware).

I installed both of the MSI cards into my system, and it went completely insane. I’d start a game — any game — and as soon as the polygons started flying, one of the cards’ fans started going bonkers. The screen would tear, artifacts would appear, and if I let this go on long enough the system would crash.
We’re still not sure what the problem was. I thought it might be an issue with stacking the cards on top of each other in the system, but I’ve had video cards on top of video cards in the past with no problems. Tech suggested I separate them, but the only other PCIe configuration that would work for the super-sized cards would put one of them a half-inch inside of my power supply.
In the end, we wound up compromising — one MSI Lightning R9 290X and AMD’s reference card, living together in perfect harmony. It wasn’t optimal, but it got the job done.
So, how’d we do?
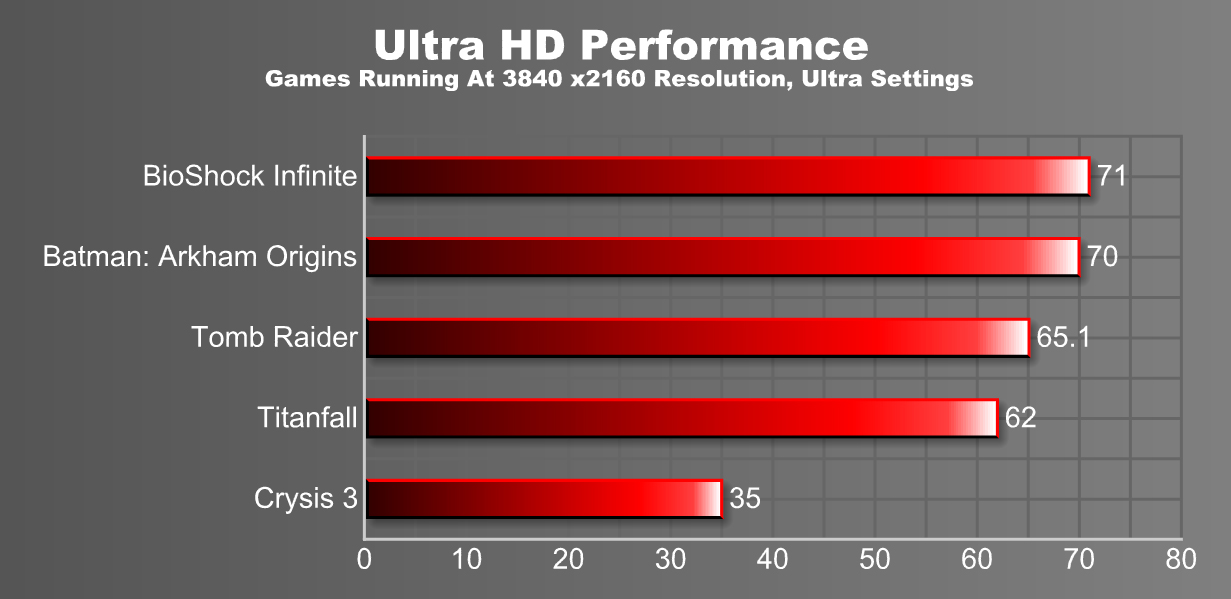
Much better. Adding another video card essentially double the frame rate of every game I tested, bringing them past the 60 mark, allowing them to sync nicely with the pricey monitor. All except Crysis 3, which is a dick to Ultra HD and computers in general.
If you’re a huge fan of triple digit frame rates, they can still be achieved, but you’re going to have to turn down the bells and whistles. Taking BioShock Infinite a couple steps back from Ultra to High brings the average frames per second to just over 100. Pick up a monitor where that doesn’t result in jaggies and tears, and you’re in business! I’m fine with around 60, for now.
Now that we’ve spent several months gathering components, assembling a PC from scratch, playing games and learning to respect AMD as a PC hardware manufacturer, it’s time to box up the pricey monitor and video cards and send them home. It’s for the best. In a few months the people in my neighbourhood are going to figure out computers, and I’ll be more at risk for a break-in than ever before.
While I try to find the styrofoam inserts for the monitor box, let’s wrap this up.
Are We There Yet, Ultra HD Gaming?
Not without a whole hell of a lot of money we’re not. With at least a pair of higher end graphic cards required to get frame rates into the 60s for recent graphics-intensive titles and the cost of securing a halfway-decent monitor still in the multiple thousands, outside of enthusiasts with money to burn and members of the gaming press borrowing a whole mess of hardware from the likes of AMD, Ultra HD is beyond the means of most consumers.
It’s going to take a steep drop in display prices. Displays even bigger than the Sharp 32-inch I used here — the clarity of Ultra HD resolution means we can put larger monitors on our desktops — need to be readily available and relatively affordable. Once you start seeing Ultra HD displays being sold at Wal-Mart, you’ll know we’re there.
The graphics hardware is getting better. AMD recently launched the $US1500 R9 295X2, a dual-GPU card specifically designed with Ultra HD and multiple monitor gaming in mind. Nvidia has its $US3000 Titan Z, created with the same intent. The hardware is out there. Most of us just have to wait for it to come down to our level.
When it does — when every PC gamer (not wearing a virtual reality headset) can sit a couple of feet away from a 50-inch display without worrying about picture degradation or eye strain — then we’ll be there, and it will be gorgeous.

Special thanks to the folks at AMD for not sending the authorities after I managed to delay this project from January to April, one week at a time. Don’t worry, your babies are coming home soon.
Comments
34 responses to “I Built A 4K Ultra HD Gaming PC… And I Love It”
TLDR – How much was the total cost of the machine?
Using pccasegear.com as a source for local pricing plus converting US$ when needed, the total was $5825. I didn’t price the copy of Windows used because it was never mentioned in the article. Going to assume that he’s using a multi-copy business version or a previous copy he already owns.
Corsair Carbide Series 500R – $159
*Sharp 32″ PN-K321 monitor – $3212
ASUS Sabertooth 990FX R2 – $229
AMD FX-9590 – $389
Corsair Hydro Series H90 – $119
AMD Radeon R9 290X – $749
*AMD Radeon Gamer Series 16GB DDR3 2133 – $260
Corsair AX 860 – $289
Samsung 840 Evo 500GB SSD – $369
Optical Drive – $50
( The * equals no stock at pccasegear.com, used xe.com money conversion)
You’re an absolute legend. Thanks.
It has 2 R9 290X so add another $749.
Whoops! Missed that detail. So it’s at total of $6574 including monitor, $3362 for the system itself.
I wish I had this kind of money…
Too rich for my blood. I’ll stick with my PS4…
I’m surprised that Mike didn’t go with Windows 8 for the OS – it has scaling support for high DPI displays.
You’d find that the AMD drivers and program would be doing that anyway.
I’m specifically talking about the case where the desktop appears tiny. Windows 8 includes high res assets and scales the UI components up similar to how OSX handles retina displays, such that this isn’t a problem. As far as I know this isn’t something any GPU drivers can handle (they’d need to provide the high res assets for multiple entire OS’s).
Such a powerful and balanced system topped off with the LS2.1
Nice
49 Unread Notifications!
WTF Fahey!!!
AMD/ATI the other 30%, not Half.
On the photo of the AMD Gamer Series box…why is there a image on Nathan Drake on the box??
I think it’s actually Booker Dewitt from Bioshock Infinite.
You’re right @wisehacker. It is Booker Dewitt…my bad
Drool….. Excuse me while I swap over my pants I left a mess in these ones. But in all seriousness if you spend that much you should have gone the extra mile and go with a custom loop.
Kinda feels like an ad for AMD. But hey the more PC articles the better.
With the price of ultra HD monitors atm, I’d get a 120/140Mhz gaming monitor.
Call me a fanboy but I just switched back to Nvidia due to AMD driver updates being few and far between. That and I love Shadowplay and Physx.
AMD is the better choice at the moment for anyone wanting to move into 4K. The current top end Nvidia cards (eg. 780 Ti, Titan Black) outperform the top AMD cards at lower resolutions, but the AMD cards are better at 2560×1600 and at 4K. The AMD cards (especially the 295X2) have superior compute performance also, so they’re better for 4K tasks other than gaming too (working with video, for example).
Yep I’m all for the megahertz monitors too! Tho I’d settle for 120Hz.
It looks nice and all and I’m all for system upgrades but it doesn’t seem like a compelling enough jump in technology to upgrade from my GTX680, might give it another year or so until my card has hit the 3yr mark.
Out of interest, how does the 4k monitor go when you play games at 1080p on it? I.e. does it do neat ‘pixel doubling’, or does it somehow interpolate and look awful?
I could see such a big display being fine for single player. However I just got a 27inch 1440p game display and I actually think for online FPS it’d be about the limit because you almost have to look around the screen to take in the image.
I felt the same when I got my 27″ monitor, a year on and I’m use to it. But I am considering a 24″ 140mhz gaming monitor as one of my next upgrades.
Am I the only one who can’t stop cringing when I see people refer to monitor refresh rates using MHz? I am? Okie dokie…
Yeah. Also just think, they either have to then run the game on terrible settings to get that or also spend a fortune on graphics cards.
Nearly a $6000 PC setup yet supported by some $10 Logitech speakers >_>
I stopped reading at the monitor. Not yet worth it if the most suitable monitor at the moment has ghosting, especially at three large!
I wish someone would advertise a PC or Laptop worthy of gaming at high quality that doesnt have a pricetag of $2-5k+
Maybe when Huccio starts releasing videos I’ll finally get round to building a 4K rig
Sooooooo, you have some really good headphones hooked up to the PC right? Because all that money thrown into a PC, just to have it output sound on some cheap Logitech speakers is almost a crime. 😛
I sure as hell hope you didn’t just run at the highest preset settings, because otherwise you had the complete performance-sink of whatever the highest AA forms are on those games. Probably TXAA and SSAA together or something, depending on the game.
If you were just running highest presets, you were effectively rendering the game at 8k and downsampling, which is by all accounts ridiculous and would be partially responsible for your awful single-card performance.
You could quite reasonably run the game with MSAA, or even no anti-aliasing at all at 4k and not find many or any jaggies.
Also, your picture of Elizabeth is only 1080p, not 4k.
Otherwise great article though, terrible shame you have to return the machine after such a nice sample of 4k.
It’ll be interesting to see if 4k drives this gen of consoles into obsolescence earlier. In two to three years 4k will be sitting in plenty of living rooms and the consoles won’t support it while PCs will. PC3/Xb360 had such a long life – will 4k kill off PS4/XBone much faster? I built my latest PC 6 months ago with 4k in mind.
I personally prefer 120Hz gaming, my rig can do 80-120fps on Metro LL, all in Ultra and I’m happy with that.