
Ever do something amazing in a game and wish you could share the clip with the world (or at least Facebook)? Well, thanks to a plethora of built-in tools and software designed to record gameplay, it’s easier than ever before. Read on for Kotaku’s (mostly) definitive guide to capturing gameplay video on your consoles, PC, or even a Mac!
We often get asked how to capture and share clips either for YouTube or for our Highlight Reel feature. During the last console generation, players had to use external devices to capture gameplay video. Now the latest round of consoles (well, two of them) have built-in video capture and streaming functions, but even those can cause some hassles if you want to upload your video to YouTube instead of OneDrive or Facebook.
Since I’ll be covering a variety of products and applications, this post will focus on the basics of each. I’ll get more detailed with the consoles since those will be the most commonly used. Let’s get started!
Useful Video Terms
Whether you’re shopping for a video capture device, trying to get video from one program to work with another, or any number of other situations, these terms might come up. This is just a super-basic explanation for each in case you get lost during this article.
- Compression — Something that makes a video, image or other file smaller than the original data. It’s why you can stream YouTube videos on your phone, and also why your video sometimes gets blocky, or text is hard to read in jpegs.
- Codec — The software that does the compression. Some codecs won’t work on a Mac or PC without third-party programs. H.264 is the most common codec right now, and shouldn’t give you problems, so don’t sweat this.
- Format / Container — Basically the filetype. Think .mp4, .avi, etc. Formats can be encoded with different codecs.
- HDCP — High Bandwidth Digital Content Protection, a hardware encryption that will prevent protected content being sent through capture software
- Component — The red/green/blue video cables that are used as an alternative to HDMI cables for an HD picture. You’ll find these on the PS3 or Xbox 360, but not the latest round of consoles. If you’re looking to capture via a component connection, make sure to check any device you have for that feature.
- (60) FPS — Frames Per Second, or how many images are in every second of video. Most web videos you’ll see are 30 frames per second, but 60fps video is starting to be supported on YouTube, so if you’re playing games that are especially fast or graphically intensive and want to show them off, keep this in mind.
- 1080p60 — This is a way of denoting resolution and framerate. Here, the 1080 means the image is 1920 pixels wide and 1080 high, and 60 frames per second. The ‘p’ stands for ‘progressive’, which is just to differentiate it from ‘interlaced’, which has to do with how frames are encoded. You shouldn’t need to worry about that part.
- Buffer recording — This can go by many names, but this is how I’ll refer to any feature that lets you hit record AFTER something has happened. The program constantly records and deletes video and only saves the last few minutes when you tell it to. This lets you hit a button after doing something unexpected to save it. It’s also how they get amazing slow-motion shots of sharks for nature shows.
General tips
To capture video from a console through a third-party device, you’ll have to turn off your console’s HDCP setting (thanks, Hollywood). Theoretically, your video apps like Netflix might not work while HDCP is turned off, but I’ve been able to use Netflix with HDCP off, so…
¯_(ツ)_/¯
When capturing video, you want to keep in mind what your goal is going to be. If you just want to share unexpected moments, you need some kind of buffer recording feature, otherwise you’ll have dozens of hours of video to go through every time you want to find a 30-second clip. However, if you want to make fragvideos of all your countless headshots, you don’t want to stop playing to click record every minute or two, so you need to be recording constantly. That means you need to be aware of how much each hour of video is taking up, and have enough hard drive space to store it all.
When using a video capture device to capture console footage, the device needs to be powered to pass the video through to your TV. If you don’t want to constantly have to switch cables around or have your computer on, you can use an HDMI splitter between your console and the capture device to avoid that problem. This will split the HDMI signal so that one can go directly to your TV and the other to your capture device. It’s a handy setup that will help you avoid some minor nuisances while playing. I’d suggest it to anyone who has some extra cash for a splitter.
The focus of this guide is on capturing short clips and getting them onto the internet to be seen by others. That is also the first step toward getting all the footage for bigger, more complicated projects, but that’s a topic for a separate article. While this post won’t explain exactly how to use every device or program, that should be easy enough to figure out. The goal here is to help point you in the right direction for whatever you might be trying to do, and to hopefully help you avoid some common mistakes.
PS4
Probably the easiest of the bunch, thanks to the ‘share button’, so let’s start here. Both the PS4 and the XBox One make capturing easy but limit your sharing options somewhat.
Capturing
First let’s set up your share button. Tap it, and when the menu comes up, press the Options button and go to Share Settings.
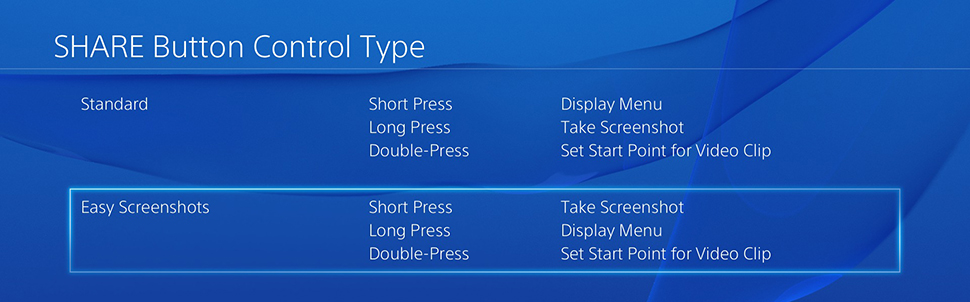
Personally, I think the Easy Screenshots setting makes the most sense so that you don’t have to hold the button down for a second when you want a screenshot that might be easy to miss. If you want to stick to the basic setting, just swap “hold” and “press” for the rest of this section.
The PS4 is constantly recording your gameplay in a temporary file, so once you bring up the share menu, you can press the square button to save a clip, or select “upload video clip”, which will save the video clip and bring you to the upload menu. Share Settings also allows you to change how much video is saved in the temporary file (up to 15 minutes), and if the PS4 records your microphone along with gameplay.
If you know you’re about to do something that you’d like to capture, you can double tap the share button to begin recording a video.
Editing
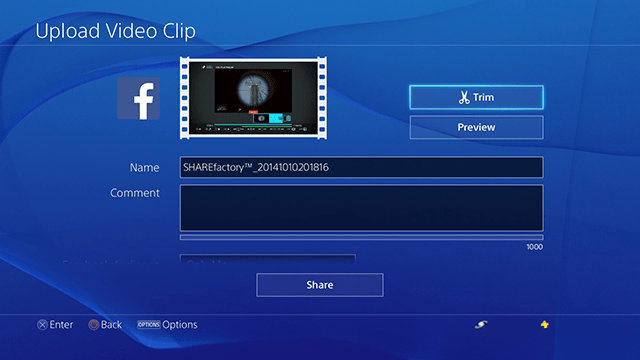
If you’d like to edit your clip on the PS4, you’ll need to do that through the ShareFactory app. It offers options to simply trim down your clip to start and end where you want it to, or to add music, transitions, and goofy effects. So you too can make a masterpiece like this:
Uploading
From any screen on PS4, hold the share button and select “Upload video clip” to upload an unedited video to Facebook. You can also upload screenshots to Twitter from here.
If you’d like to upload your video on YouTube or somewhere else, go to the home screen and select Capture Gallery to choose your clip. Click Options, and you’ll see an option to copy the video to a USB drive. You can then take the video clip to your computer and edit it, upload it, or put the drive in a tiny box and cherish it. Whatever makes you happy.
XBOX ONE
Of course the Xbox One won’t be left out, so you can capture and upload videos natively here too. The process is going to vary a bit if you don’t use Kinect, so I’ll cover both.
Capturing
First, the quickest way. When playing a game, the Xbox One is also constantly recording video to a temporary file, but unlike the PS4, the buffer is only 5 minutes. When playing a game, you can say “Kinect, Record That”, and it will save the last 30 seconds of video. If you don’t want to talk to your TV, you can double tap the Xbox button and press X to do the same thing.
If you want to record a longer clip, you need to snap the Game DVR app, either by going to the dashboard or by double tapping the Xbox button. You’ll see an option to “End clip now” or “Start new clip”. End clip now will let you record video from the past five minutes, and start new clip will let you record up to five minutes of video.
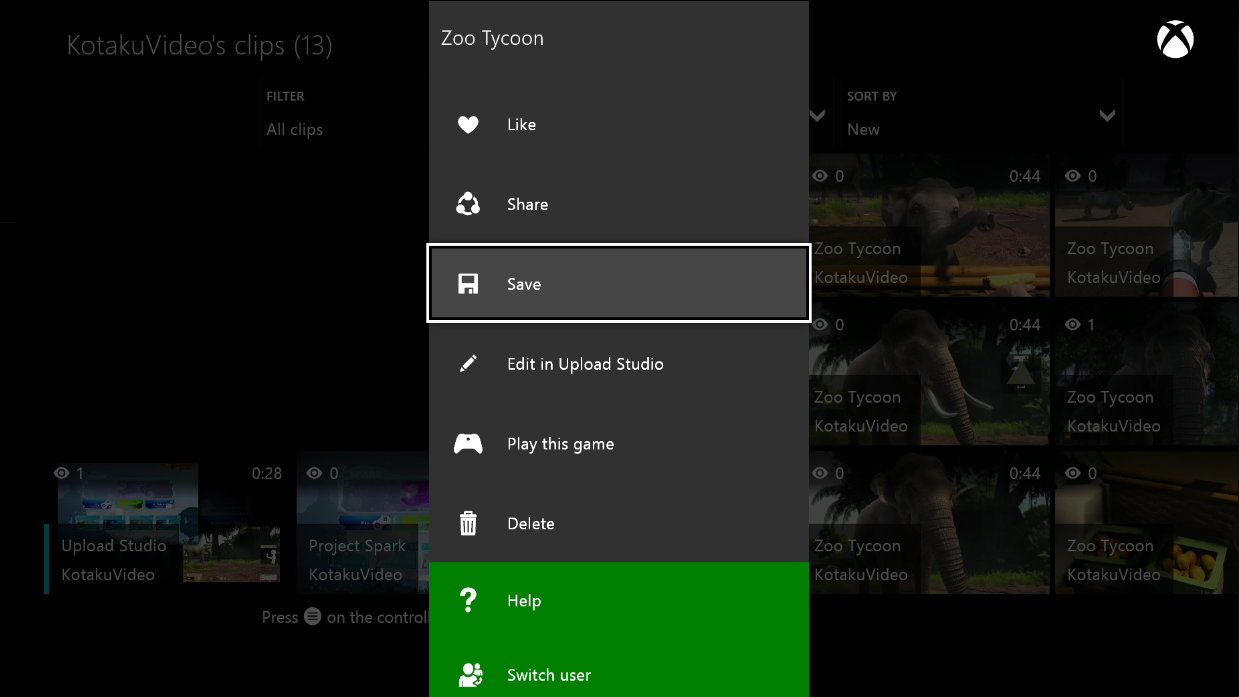
Here’s the catch: You still haven’t actually saved your video. When you record a clip with Game DVR, it will show up under “show my clips”. Then you need to find your clip, hit the menu button and select Save. If you don’t, your clip will eventually expire. You can also save clips in the Upload app.
Editing
Editing on the Xbox One is done through the Upload Studio app, which you can download for free. Like PS4’s Sharefactory, it gives you the options to just trim the clip’s length or do more complicated edits like add intros, kinect video, voiceover or combine clips.
Uploading
Uploading, is done (naturally) with the Upload app. That will let you share clips on Xbox Live, on your activity feed, or with your friends. You can also easily find your clips with xboxclips.com. It’s a third-party site that accesses public videos from Xbox Live, so if you don’t want your clips to show up here publicly, you need to use privacy settings to set your videos to friends only.
If you want to share something beyond Xbox Live, you’ll need to use the free Upload Studio app to upload to Microsoft’s OneDrive. Once your video is on OneDrive, you can share a link with anyone (depending on your privacy settings), download the video, tag people, etc.
With A Capture Device
OK, so you’ve outgrown the built-in capture tools and you want to get fancy. Maybe you’re starting a YouTube channel, or you just have higher standards than ShareFactory can meet. Maybe you just want to capture video from your Wii U or Ouya. You’re going to need a third-party capture device. These are some of the popular products that I have experience with, but they’re definitely not the only options out there. This also isn’t a guide to using each device, just a guide to point you in the direction of some good options.
Blackmagic Intensity
When I first started doing game capture, I used a Blackmagic Intensity Pro, an internal card for desktop computers. Since then, Blackmagic has branched out, adding external USB and Thunderbolt devices, so I can’t speak for those in particular. From my experience, Blackmagic’s hardware was pretty solid, but the software left something to be desired. This may have changed in the past two years, but Blackmagic’s primary focus isn’t gaming, so you aren’t going to find certain game-focused features here. The flip side is that Blackmagic makes a wide range of professional video products, so you can expect a pretty good baseline level of quality.
The Intensity capture devices run from $US200-300. A benefit is that they can record uncompressed video, so you can get the highest image quality possible. The drawback is that the highest resolution and framerate you can go to is either 720p60 or 1080p24. There are interlaced settings, but who really wants that?
Avermedia
I asked our own Mike Fahey for recommendations here. He recommended the Live Gamer Portable over the latest model, the Extremecap u3. The latter lets you capture uncompressed 60 fps video via USB 3.0, but it’s only compatible with certain USB chipsets, which means you may not be able to use it depending on your computer’s parts. So for most people, the Portable seems like a more versatile option. That will let you capture 1080p30 footage from consoles and includes a component cable input.
Happauge HD PVR series
I haven’t used these myself, but they’re another popular product for recording gameplay. These will record up to 1080p30, compressed with the common H.264 codec that will take up far less space on your hard drive than uncompressed video. If you’re using a Mac, all but one of the models will require you to purchase separate software. Check out all their models here.
Elgato Game Capture HD
These are what we use here at Kotaku and what I use at home. (Kotaku purchased some of our Game Capture units and received others from Elgato. I purchased my personal unit.) The Elgato Game Capture HD60 is the newest version, which is HDMI-only, and can capture up to 1080p60. The Game Capture HD will only go to 1080p30, but it includes a component adaptor for PS3, and is a bit cheaper.
Windows
Fraps
Fraps is the classic PC gaming capture program. It’s cheap, built just for gaming, has benchmarking features built in, and it’s also really outdated. I hate to say it, but the age of Fraps has passed. Don’t get me wrong, it’s not a bad program, it’s just a very outdated one. It doesn’t record compressed video, so any file you record is going to take up a ton of space until you convert it. It can’t record your desktop, only video direct from an application, and it has no type of buffer recording. If you have it already, it’s fine, but if you’re looking for to buy your first capture software, there are better options out there.
Bandicam
Bandicam is my personal go-to software for PC capture. It’s a great all-around program for recording compressed H.264 video that won’t take up a ton of hard drive space. Aside from direct capture from games, you can set it to record your whole desktop or just a section of it, so it’s versatile enough to record browser or flash games. It will run you $US39 for a licence, or you can download a trial version that will put a watermark on your videos if you want to test it out.
Shadowplay
If you have a new-ish Nvidia graphics card, you can use Shadowplay, which is available for free from Nvidia. This is probably the best option for direct PC game capture, as it has a buffer feature so you don’t have to constantly record. Just hit a hotkey after something great happens, and Shadowplay will save the last section of video (its length will depend on your settings and hard drive space). You can also manually start a recording, record a mic, all the good stuff you’d expect.
OS X
iShowU HD
iShowU HD is a good all-around option for video or game capture on a mac. It will only run you $US30, and can record fullscreen as well as letting you capture a set region of the screen. Since it’s not designed specifically for gaming, it comes with other screencasting features like highlighting mouse clicks or displaying keystrokes.
Screenflow
Another good program for Mac screen capture, but at $US99, it’s probably more than you want to pay for game videos. If you’re curious about it, there’s a free trial you can test out. Screenflow also comes with other screencasting features, as well as a built-in basic editor.
Editing
Now, to get your your video online, you can just throw it up as-is onto YouTube, Facebook, OneDrive, etc. This works fine for shorter clips, but if you want to create a montage, trim a long video, or add music or effects, you’re going to need a way to edit your videos. Above, we talked about the built-in editing systems on the Xbox One and PS4, but that only works for videos captured on those platforms.
General Tips
As always, think about what you want to do and who your audience is. If you’re trying to show off a funny 10 second clip, don’t add a 15 second intro on the video for people to sit through. (Ideally you’d never add a 15 second intro to anything that isn’t a TV show, but hey, that’s just me).
Remember that less is more. This is one of the funniest glitch videos I’ve ever seen, and the only edit required was adding a song:
Here are some good (mostly free) options that will let you quickly trim clips, add music, convert videos, or even dip your toes into some more serious editing. If you want more, Wikipedia naturally has an exhaustive list of video editing software.
For Mac & PC
YouTube
For the simplest edits, you can just use YouTube’s built-in video editor. It’s certainly not the most advanced software available, but it’s totally free, requires no download, and lives on the same site that you’ll probably be uploading your video to. It gives you the ability to trim and combine clips you’ve uploaded, add filters and text, and most importantly, star wipes. You can even search for free audio tracks and creative commons videos to add to your own project.
MPEG Streamclip
This is an old standby, mostly for converting videos with different codecs, but can also be used to quickly trim videos without going through the long process of rendering. It’s free and available on Mac and Windows, so it’s a good idea to have it around for whenever you might need it.
Quicktime Pro
Quicktime Pro is also handy tool to have around. It offers lots of features, but most relevant to game capture is the ability to easily trim videos without rendering. It may be pre-installed on your work or school computer. If not, it will cost you $US30, so this might not be your first choice.
Lightworks
If you really want to get serious, but don’t have any money, Lightworks is a fully-featured video editing program that offers a free and a paid version. You can download it right now, and it works on Mac, PC, and even Linux!
Mac Only
iMovie
This is the obvious go-to simple editing program for Mac users. It’s free and probably already installed on your computer, so there’s no harm in using it, but if you just want to trim your clips, it will probably make things more complicated than necessary. Stick to MPEG Streamclip
PC Only
Movie Maker
There’s a free program called Movie Maker that you can download for Windows 7 and 8 here. Windows 8.1 also offers some free tools that let you do more basic tasks like trimming clips, you can find more info about those here.
So that’s it! You should be well on your way to capturing some exciting videos of your gaming achievements. If you have any other suggestions or tips put them in the comments below.
Picture: Tara Jacoby
Comments
5 responses to “How To Capture Video Game Footage On PS4, Xbox One, PC And Mac”
I’ve been using AMD’s ‘Raptr’ software recently to record my gameplay footage on PC. While not quite as perfect as Shadowplay, it is streets ahead of FRAPS.
It’s ‘Xbox, record that’.. Addressing it as Kinect will just have you yelling at you TV a lot.
With Xbox One, you can also upload recorded videos directly to Youtube using the Youtube app.
Not even going to mention the EXCELLENT (and free) FFSplit for PC?
Shadowplay sounds awesome, buffered recording sounds really cool. I’m using FRAPS at the moment, and I love it, but it surely is a hog when it comes to disk space. I’ll have to check out this Bandicam.
I’m surprised Open Broadcaster (OBS) didn’t get a mention. I’ve been using OBS for all manner of things and there’s an Elgato GameCapture HD plugin available for it to so you can use it for both game capture and streaming on both your local PC and on your consoles.