Battlefield 1’s multiplayer is very intense. While the game teaches you some basics during the campaign, it doesn’t do much to explain what’s going on in the multiplayer. Don’t worry, doughboys and gals: I’m here to help!
Know Your Game Modes
Battlefield 1 has six multiplayer modes at the moment:
Conquest is the bread and butter mode of any Battlefield game. In it, two teams face off to a capture flags around the map. Holding these positions gives you points. The goal is to reach 1000 points. The more flags you hold, the faster you get points. Additionally, killing members of the enemy team also adds to your point total.
Rush involves a team of attackers and defenders. The defending team needs to protect telegraph posts from the attackers. The biggest change in this mode is that attackers have a limited amount of lives, called “tickets”. Each death costs one ticket — run out and you lose. You have to capture multiple posts in a sequence to win a match.
War Pigeons functions like a capture the flag mode. Small teams compete to capture a pigeon somewhere on the map. After capturing the pigeon, they must hold onto it for a short time before it will be released. Releasing a pigeon summons a massive artillery barrage on the map and spawns a new pigeon to capture. You must capture and release three pigeons to win.
Team Deathmatch is exactly what you would expect: Two teams compete to reach a certain number of kills. This number varies depending on what server you’re playing on. The team to get the required number of kills first wins.
Domination takes the core concept of Conquest but shrinks the size. Teams are smaller and maps are more condensed. The goal score is only 100 points. Otherwise, it functions exactly like the traditional Conquest mode.
Operations is Battlefield 1’s most prominent multiplayer mode. Operations are pretty cool but can be very confusing for new players. Operations function as something of a combination of Conquest and Rush. Two teams face off. The attacking team has three battalions, which are basically just ticket-based attack waves. Defenders do not have tickets. With these limited battalions, the attackers must sequentially conquer sectors on multiple maps. The number varies depending on which Operation you are playing.
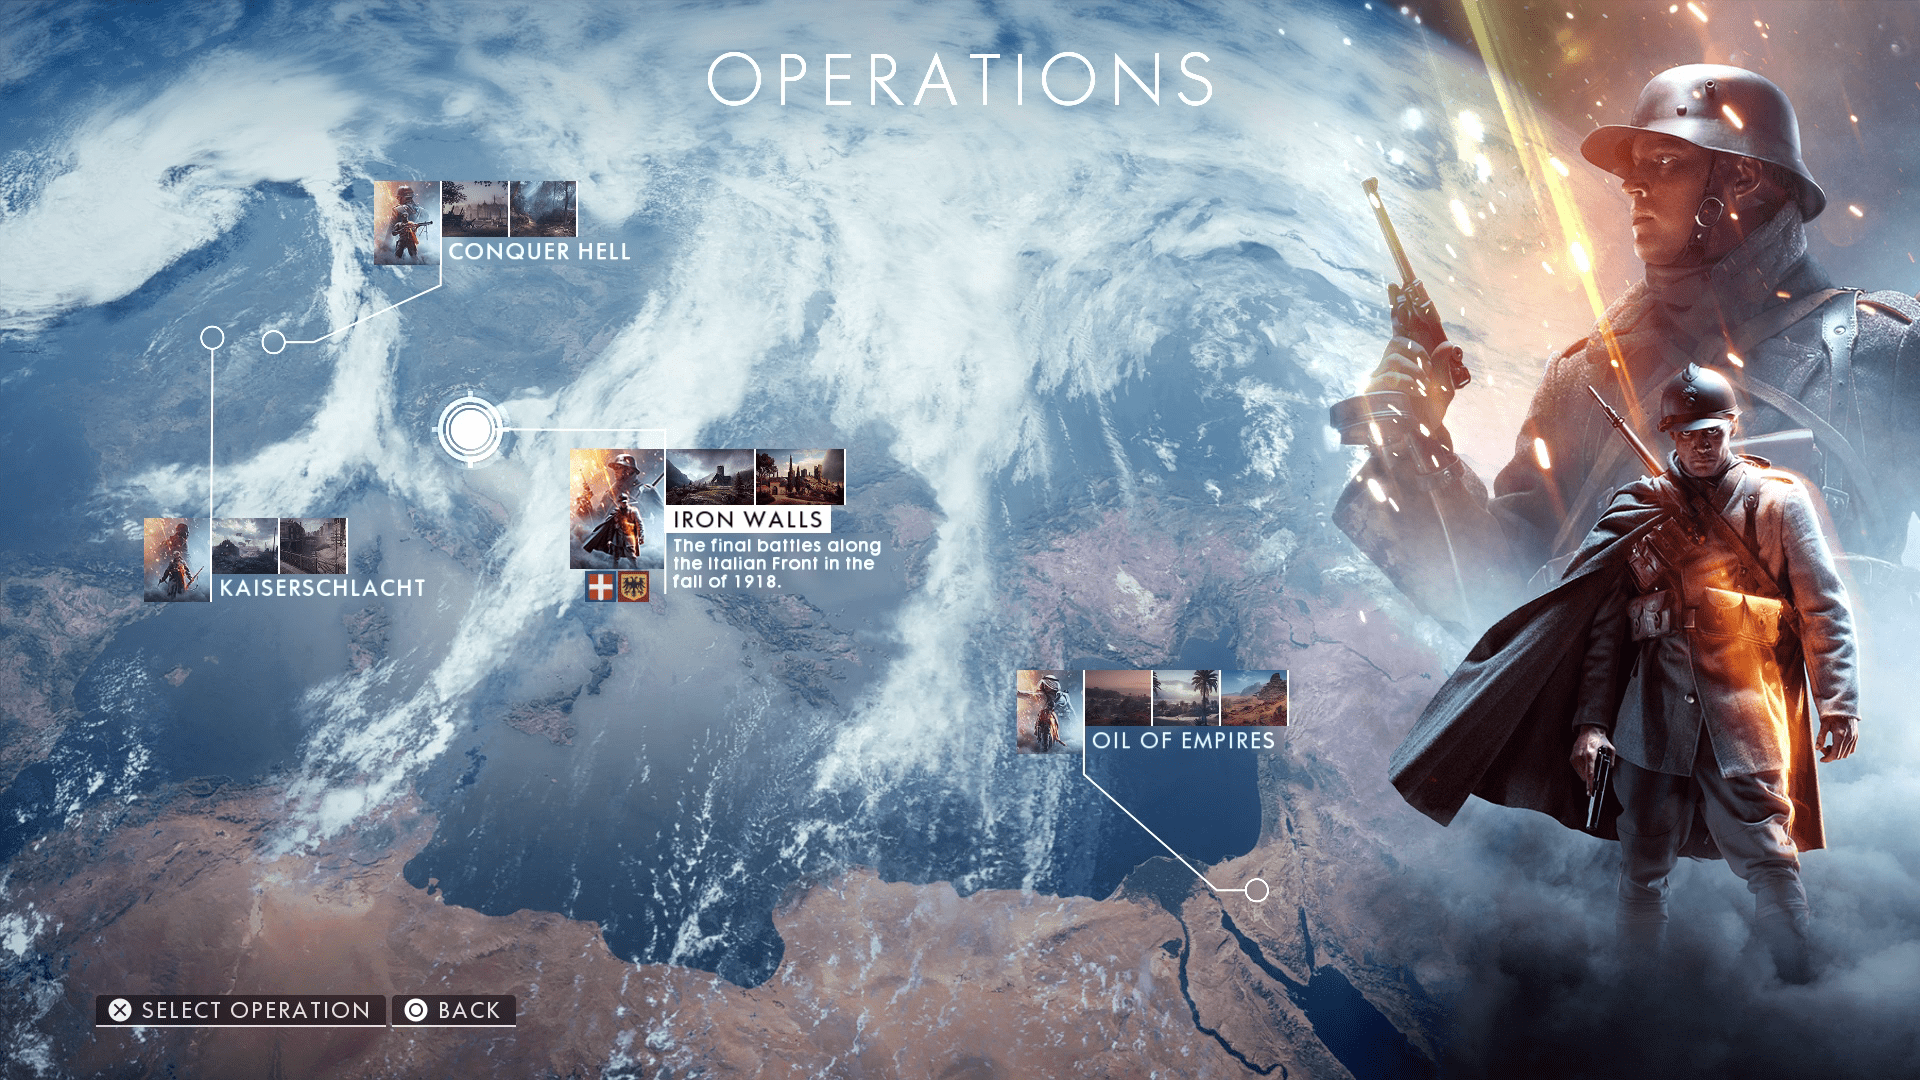
To capture a sector, the attackers need to capture two control points. Once they have control over both points, they drive the defenders back to the next sector. This process continues until they either control all sectors or use up three battalions’ worth of tickets. If any of this seems confusing, I recommend the videos by Westie that have been making the round. They do a really good job of explaining modes exhaustively. Here’s his video for Operations:
Operations are my preferred way to experience Battlefield 1 because they are constantly changing. If a team is struggling, they might be given special advantages between rounds. Armoured tanks, blimps or battleships will be given to a team lagging behind. There’s also a narrative through-line that plays between the matches depending on who is winning.
THE BASICS
Don’t worry about your kill/death ratio.
Battlefield is about points. It’s about capturing positions and ordering squads. It’s about objectives. Play the objective, follow squad orders and don’t worry too much about dying. Everyone dies. But if you play hard and do your job, you can contribute more going 7-13 than 18-2.
Mark all enemies.
If you see an enemy, you should mark them immediately. R1 on PS4, RB on Xbox One or Q on PC will place a red marker on the enemy. This makes it easy for you and your team to spot them. Mash that button even when you don’t necessarily see baddies. Sometimes you’ll ferret someone out of hiding.
Lead your squad, sergeant!
I made an entire post about this, but if you are the leader of a squad, you need to issue orders. It’s just like marking: Point to an objective and hit the spot button. You will be able to designate a point for attack or defence.
Switch kits on the fly.
When folks die on the battlefield, you can take their weapons and kits. Did a Medic just die near you? Take their kit and revive them with their supplies.
Aim where enemies are going, not where they are.
Bullet physics matter in Battlefield. Don’t fire at where someone is, fire at where they will be. If firing over a longer distance, be prepared to account for bullet drop.
Horses are magic!
This is a fun one: If you’re ever in desperate need of ammo and no one is around to give it to you, just climb on a horse and get off. Full ammo!
Good job, you’ve been promoted.
Earning points increases your level and ups your rank. You receive “war bonds” each time you level up. These are the currency you use to buy new weapons. To buy them, go to “customise your loadout” when you spawn. You’ll be able to buy out new guns and equip them.
Classes have their own levelling system.
You level up your rank in different classes by playing as them. You unlock new weapons for purchase at certain class levels. You’ll still have to buy them with war bonds, so plan accordingly!
Battlepacks are bullshit.
Occasionally after a match, you will randomly receive a battlepack. These RNG-based crates unlock different skins for your weapons. Keep in mind that getting a skin does not unlock that weapon. You can turn skins into scrap to buy higher quality packs if you want, but otherwise they don’t really change the game much.
Use your sidearm.
Pistols are surprisingly effective in Battlefield 1. You have an M1911 by default across all kits. It’s great. Pistols are phenomenal in tighter spaces and are perfect to switch to if you have a weak enemy but no ammo in your primary. Don’t hesitate to use them!
THE CLASSES
You have four classes to choose from in Battlefield 1: Assault, Medic, Support and Scout. All have strengths and weaknesses, specific weapon focuses and additional utilities.

ASSAULT
Play Assault if you want to kill dudes.
Assault gets in close and fucks shit up. You’re not going to be the most refined soldier on the battlefield, but if you want to keep things simple, Assault is the class for you.
Get in the enemy’s stupid face.
In terms of weapons, you have a choice between sub-machine guns and shotguns. Neither are great at range, so get in close and let the other team have it!
Blow shit up.
In Battlefield 1, Assault soldiers are the folks to call if some enemy armour has you pinned down. From TNT and mines to the most esoteric anti-tank rifle, you will have plenty of tools to deal with landships or tanks. All of these hard hitting weapons and tools mean the Assault class can quickly turn the tide of a fight.
Move!
The Assault class is a furious role that rewards risk. If a tank is in the open, book it, drop some TNT and detonate. Even if you get caught in the explosion, you’ve made a huge difference.
Find a buddy.
Assault soldiers should buddy up with Medics. The classes mesh well, with the Assault able to handle immediate threats while the Medic heals them up and offers mid range assistance.
AT Grenades are heavy.
Anti tank grenades have a lot of heft and a longer travel time than you think! Aim your throw arc a bit higher and lead a little bit more when using them.
Shoot from the hip.
Don’t look down your iron sights too much. The Assault class is about output, not precision. Fire away!
Use the right Assault weapons.
Grab a variation of the Auomatico m1918 as soon as you can and then focus on Model 10 variants for your shotguns. If you really want to go mid range, the MP18’s Optical version will do in a pinch. TNT is a bit more technical to use than other tools but highly recommended if you want to take out armour quickly.
As a side note, the Assault class actually has one of the few good level 10 class weapons: The Hellrigel 1915. Level up and grab this for the best Assault weapon in the game.
MEDIC
Keep people alive.
Medics have access to medical syringes that revive downed teammates as well as a bandage pouch that can be dropped for healing over time. A larger medical crate later becomes available with a little more kick.
Follow the skull icons to recently killed buddies and stab them with a syringe to bring them back to life. Make a habit of dropping heal near clustered allies or those hiding in corners. They’re the ones who probably need it the most.
Medics can fight too.
Medics primarily uses self loading rifles. They don’t hit as hard as what the Scout uses, but they do fire faster. If you deck one of these out with a scope, the Medic can become a formidable fighter who can even do some counter sniping. Hell, if you’re desperate, you can stab someone with your syringe.
Save yourself.
It’s easy to forget that you can heal yourself as well. When you’re on the brink of dying, toss a med pouch at your feet.
Open fire!
Certain Medic weapons can be toggled to an automatic fire mode. Switch to full auto and pin the enemy down with heavy suppression if you don’t feel confident setting up for more precise shooting.
But also take your time.
If you are using an optical or marksman version of one of the Medic rifles, don’t be afraid to take a moment to line up your shots. With precise aim, you’ll down enemies in two to three rounds.
Most non-healing tools are useless.
Avoid the rifle grenades. They take up a slot in your kit that could be used for healing items, and the HE grenades aren’t damaging enough to make for good anti-vehicle use either.
Use the right Medic weapons.
Scopes are crucial for this class. Aim for a Selbstlader M1916 Optical or Marksman. It’s a flat upgrade from your default Cei-Rigotti that should become your go-to rifle. For close encounters, grab the M1907 Trench or Sweeper.

SUPPORT
Play Support if you want a lot of options.
This is the class with all the cool stuff. Limpet charges, mortars, light machine guns — with a little ingenuity, you can kit out your Support soldier to fill a variety of needs. Go wild and experiment!
Stock up and repair everything.
Support soldiers have access to ammo drops and boxes that work much like the Medic’s health packs. They also have access to a wrench that can be used to repair vehicles. Whenever you’re not killing, you should toss out ammo like lollies and repair whatever you can.
You’re the wheelman.
This is the class to be if you want to drive vehicles. Do your damage and then find a safe place to conduct repairs with your wrench before heading back into the fray.
Take the high ground.
All classes benefit from elevated positions, but the Support class really uses it well. Think spatially and look for buildings that will provide you a solid place to fire on enemies.
Keep firing.
Your machine gun gets more accurate the longer you hold the trigger. Don’t fire in tiny bursts. Unload your clip and transfer the spray to your next target when the first one falls.
Fix up your kits.
Tools are limited. Consider making a few different pre-made loadouts to swap in and out situationally: A limpet mine build for anti-tank action, air mortar for anti-infantry.
Use the right Support weapons.
The default Lewis Gun is astounding and can serve you well throughout your career, but the real prize is the BAR M1918. Power through to class level two and grab it. If you want something that will work best over long distance, take the M1909 Benét — Mercié.
SCOUT
Scouts are sneaky, sniping bastards!
Scouts are your snipers. In the right hands, this is a powerhouse class that can significantly confuse enemies and cut through their ranks. It’s also a very demanding class in terms of twitch skill and situational awareness, but if you are patient and take the time to really learn this class, it will pay high dividends for your team.
Be proactive.
Shifting positions, adjusting angles and avoiding complacency are essential as a Scout. You need to have sights on where the enemy will soon be. Where are they pushing next, and where can you be to best cover that position? Scouts need to think just a few steps ahead.
Communicate.
All classes can mark, but Scouts can survey areas in a way no other class can. Calling out the enemy position and keeping your team well informed of their moment will help them organise strong counter offensives. The flare gun is a great tool, marking a wide area of the map when used. If you’re not killing the enemy, at least make sure that your teammates will be able to react in time.
Don’t panic.
If you’re being fired upon, keep calm. You usually have time to pivot and fire your own reply. Shift, scope, aim for the head and fire. As long as it is just one enemy, you’re in the clear.
Stand up tall when you have to.
Going prone will deploy a bipod on most rifles. The added stability is nice but can come at the cost of a limited angle. If you have to stand up to line up a shot, go for it.
Set your traps.
Tripwire bombs will help you secure strong camping positions if you want to lay down, but they can also be used more actively to wire pathways you know enemies will follow. Think about where the enemy will need to go and lay your bombs there.
Find the sweet spot.
Sniper rifles have a mechanic where their damage starts high and then gets even higher at a certain range before falling off. As an example, my preferred rifle (the Russian 1895 Sniper) hits its max damage potential once the bullet has travelled 60m and only falls off once it has travelled around 100m.
This means if I land a body shot in between those distance values, it will kill the enemy in one bullet. If you know the engagement range you tend to fight from, you can use the stats at Symthic to find the perfect rifle for your sniping preferences.
Don’t get cocky, kid!
Be realistic about your shots. Long distance Hail Mary head shots are tricky. Sometimes it is enough to hit the body and force the enemy to fall back.
Use the right Scout weapons.
Grab the Russian 1895 Sniper and don’t look back. If the higher magnification proves difficult or you prefer shorter engagement distances, take the SMLE MKIII Marksman instead.

Oh, yeah. Have fun!
Video games are pretty exciting. It can get easy to give into your competitive side, but Battlefield is so chaotic that you just need to embrace it. Take breaks, play with friends. Do whatever you have to do to keep a cool head. After all, it’s just a game.
Comments
13 responses to “A Beginner’s Guide To Battlefield 1 Multiplayer”
You missed the most important 2.
1. If you are driving a tank dont sit in spawn and lob rounds randomly into the battlefield Tanks are there to help advance with Frontline infantry!
2. If you get to drive the airship, DONT PARK IT ON TOP OF ALL 3 AA GUNS FFS!
Oh, yeah. Have fun!
Don’t tell me what to do!
Do what you want to do! Or else!
Also, if you have a chance, memorize the minimap of each map. The minimap or the spawn-map are both oriented with north up top, so if you memorize it then calling out positioning to your squad/team mates becomes easier with a fixed position instead of saying “it’s on the right” “which right” *dead*.
Also, when talking about “aiming where the person is going to be” isn’t accounting for bullet drop, it’s called “leading a target” and it’s to account for motion because the bullet is an object in the world, it has travel time that is called “muzzle velocity” on most sites that talk about gun stats. Basically by the time your bullet will reach the person they’d have already moved from that spot, so you have to account for that along with bullet drop which is where over time the bullet will fall to the ground, so the further you are the higher above the person you aim.
Something I complain about with my cousin a lot is what I call lane-ing. If you’ve played a moba you’ve probably gone through the ropes but if you look at a lot of Battlefield maps you’ll notice that certain points are in clumps together, or in lanes. Basically just keep to those and try not to go out of that lane because of the dead time from travelling between points. Those open areas are also pretty deadly too, and you wanna stay alive because you can be useful unlike when you’re on the ground waiting to respawn.
For an example on lane-ing in Battlefield, I’ll show a picture of Battlefield 4’s Propaganda map from the Dragon’s Teeth DLC.
http://www.bfcentral.net/bf4/wp-content/uploads/2014/05/bf4-propaganda-overview.jpg
If you look on the left side, you can see points B and D and on the right you’ll see points A, C and E. In between those two sets of points is a long strip of open road. That open road is a dead zone and you’ll often find yourself under heavy fire from people in one of those two lanes or the tanks that will use it to shortcut between points.
Lane-ing has another benefit, and I’ll be showing Operation Locker for this.
https://i.ytimg.com/vi/x8mMmTqulQI/maxresdefault.jpg
I don’t have a name for it, but we can refer to it as chaining or stringing. If you’ve played the chain-link game mode then you’ll already get the idea, but basically you want to keep a string of points under control, because you can spawn on those points. If the opposing team manages to sneak behind and capture a point behind you in your chain then they can spawn behind you and disrupt your defensive line. I’ve seen this happen tonnes in Lockers and it can break a good offensive and shift the tide of the game. If you stick to your line and defend it then you’ll be good.
But what if things aren’t in a straight line? Well, let’s look at Naval Strike’s Nansha Strike.
http://imagescdn.tweaktown.com/content/6/2/6220_31_battlefield_4_naval_strike_gets_detailed_in_55_high_resolution_images.jpg
You can see in the middle there is three points with four points in respective corners on the map. We want to apply the same logic here with grouping the middle points and the outer points as two separate lanes. Unless you’re in a vehicle, getting to these corner points from the middle is a long swim where you’re wasting time when you could be doing something useful. Generally these points are dealt with by using the attack boats, RHIBs and helicopters you are given. If you spawn on these corner points I hope you have a way to get where you’re going.
Because it wasn’t mentioned under Medic, but if the revival marker is blinking then the person is skipping their timer, so don’t bother trying to revive them.
Also, when you’re on a contested point, I’m unsure of the prerequisites but near the top middle of the screen will be a coloured bar, blue for ally and red for hostile. It shows how many of each team are on the point.
Ive been using the Mondragon Sniper as a medic and it feels like a nice midrange sniper class with the ability to heal + revive. Good times!
Have you tried the Selbstlader Marksman?
The Mondragon is better at medium range, but the Selbstlader is so accurate. It fires a little slower but is more accurate, still kills in three shots, and has a 26 round magazine – so it reloads much faster too.
(The Mondragon Storm is still my person favourite all around though)
I’ve unlocked it but haven’t tried it properly. Will do!
Good to see a Battlefield 1 guide that doesn’t diss Xbox One users like the previous one from this writer did.
If you get set on fire (incendiary grenades, flares, map fire), crawl on the ground to put yourself out.
Step 1 – DROP MED BAGS AND AMMO PACKS
Step 2 – MARK OBJECTIVES AS SQUAD LEADER
Step 3 – Profit
Solo attack caps with buildings using the automatico and gas grenades. Congratulations you are now a war criminal and #1 leaderboard holder.