Modern board games are filled with tokens. If you’re playing adventure games like Lord of the Rings: Journeys in Middle-Earth or Mansions of Madness, you’ll find yourself inundated with hundreds of tokens of all sizes, shapes and uses. During gameplay these tokens will come in handy, but if your set-up is disorganised you’ll hold up the game trying to find the right pieces. While you can purchase expensive token dividers online to help, there’s another important solution.
If you’re struggling to keep your board game tokens organised in their box, you can create your own DIY dividers out of cardboard. Forget the $40 foam inserts or the expensive Worbla experiments. All you need is some old cardboard and a pair of scissors. It’s not pretty, but it’ll get the job done cheap.
First, find some old cardboard or a box you don’t need. Compare the length of that box with your board game box. Make sure it’s equal or larger than the space you need to divide.
If you want a pretty board game divider, grab a ruler and mark out the length you’ll need.
Your next consideration should be how many pieces you’ll need to separate. Sort your tokens into their respective categories and see how many ‘slots’ you’ll need in your divider. Mansions of Madness contained about 15 unique tokens, but some of them could be sorted together — so I decided 12 slots would be enough.
Once you’ve got that sorted, cut your cardboard. First, cut strips equal to the length of your box. Make sure each strip is between 5-10 centimetres in width (this will determine the height of your dividers). You’ll need 2-4 long pieces of cardboard, depending on how many slots you need to divide tokens.
Next, cut strips equal to the width of your box. Make sure you have enough pieces to create the slots you need. (For a nine-slot divider, you need 2 x strips lengthwise and 2 x strips widthwise.)
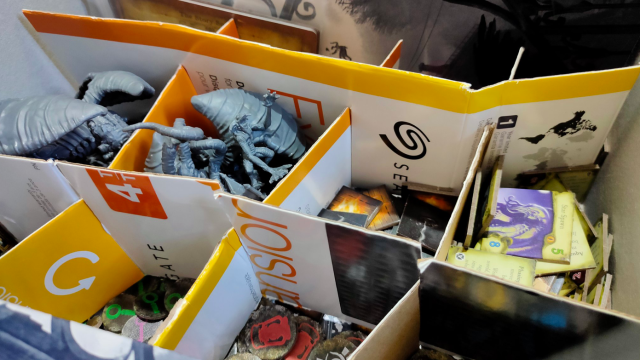
Once you have your cardboard cut, line up the pieces as you want them to fit into the box.

To slot them together, you’ll need to cut halfway through the cardboard on each strip in the right position, then repeat the process for the interlocking piece of cardboard. The slits should match up so you can slide your pieces together easily.
The best and most accurate way to achieve this is by lining up your pieces and pressing down on the cardboard. You’ll get a small indent on both sides and a great indicator of where to cut.
Make sure you cut every piece deep enough so the cardboard hits the bottom of the divider — this makes sure all the tokens stay firmly in place.
Once you’re happy with your DIY board game divider, simply slot it into your board game box and fill it with your tokens. If you want some added security, you can glue the pieces together or glue them into the box but this isn’t strictly necessary.

If you use a ruler to mark out your cardboard pieces and plan your cuts carefully you’ll end up with a much neater divider than mine, but either technique is very effective. Plus, it won’t cost you a dime.
The best things in life are free, and board game dividers are no exception. DIY can really save your board game experience.
Leave a Reply