As one of the most powerful handheld devices out there, the Steam Deck is a great, one-of-a-kind gaming platform. While some games might require you to fiddle around with the graphical settings to get the best performance out of them, the experience of playing a game on the Deck is often frictionless. That said, there are ways to get more out of Valve’s mini-PC that aren’t immediately obvious. Here are some tweaks and other tips to consider when setting up and using your Deck.
You don’t need to be a power user to make the most of these settings and features. Some, like the screenshot shortcut (Steam + R1) are pretty handy, while others like the lock screen settings are essential to configure if you want to stay on top of who has access to your device.
[Note: No, we still can’t get a Steam Deck here in Australia but that doesn’t stop us from dreaming about it. Use this guide as preparation for when you do manage to get your hands on one, if ever. – Ky]
Turn on your lock screen
As with many portable devices, you probably want to have some kind of lock screen to keep unwanted users out of your Deck.
Hit the Steam button, navigate to Settings and under Security you’ll find options for the Lock Screen. You’ll set up a number-based pin, which you can use the Deck’s gamepad buttons to enter. It becomes really quick to get in once you memorise it.
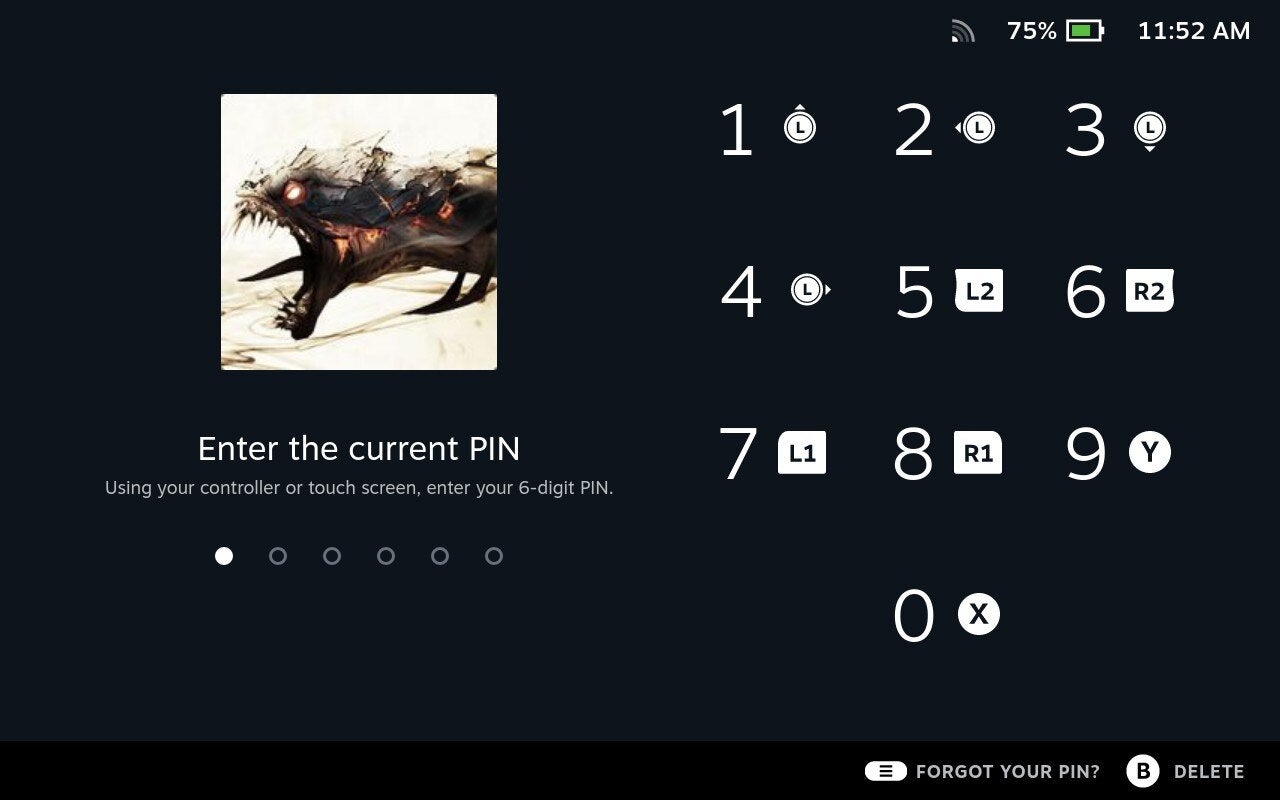
The most secure option is to make sure all three options in Security are switched on. But you’ll have a choice as to whether you want your Deck to prompt a password screen whenever you wake or power on the device, when you switch to desktop mode, or when the login screen appears.
Test drive all your games in offline mode before a big trip
You can take the Steam Deck anywhere. But as many Deck owners have discovered, one of the growing pains in turning Steam into a portable platform has been dealing with games that require online authorization, launchers, or other functionality that demands an internet connection. There’s nothing more frustrating than getting on a plane and discovering the title you had planned to pass the next several hours with won’t work because there’s no internet.
Obviously if you’re planning a trip where you won’t have a connection, you shouldn’t be trying to play a multiplayer game or anything where online functionality is essential. But sadly, on Steam even many single player games require some kind of internet-based authentication process.
To make sure your games will work offline, test drive them in offline mode. Hit the Steam button, and navigate to Internet. There you’ll find an “Enter Offline Mode” button. Then fire up the game you’re hoping to play to make sure it works without the internet. I recommend doing this for every game you plan on playing before a trip. Actually get into a game and run around or something. Don’t just let it sit at a menu. You want to make sure your game is playable, not just that it launches and will later prompt you with some internet issue.
If you’ve got a trip coming up, you probably should leave the Deck in offline mode once you know it works, just to be safe.
Check for OS updates (and choose which OS channel you want)
Valve pushes out updates for SteamOS, the Deck’s operating system, pretty often. You can check what updates are available by hitting the Steam button and navigating to Settings.
In Settings, you’ll find a “Check For Updates” button under “System.”
If you like to experiment with new features before they launch, however, you can opt into two alternative OS branches, Beta and Preview. Note: Experimental features might cause system instability or lead to crashes, so if you want to ensure the most reliable of possible experiences on the Deck, just double-check that you’re on the “Stable” channel. For an average user, this is the best option.
The System area of the settings is also where you’ll find the option to format an SD card.
Tame your notifications
Annoyed by all those notifications about what games your friends are playing and when they’re playing them? Easy! Head on into Settings (Steam > Settings) and under Notifications you can either select a general “Disable non-critical notifications” setting, or turn specific ones off, with options for both the visual and audio indicator.
Switch to Nintendo Button Layout if you prefer Switch-style select and cancel buttons
If you prefer your “Accept” button to be your right-most face button and your “Cancel” button to be the lowest face button, like it is on Switch (and many old PSX games), simply flip on “Use Nintendo Button Layout” under the Controller selection in the Settings.
Note: Though this change will be reflected in some games, button prompts on screen won’t always match the physical hardware. For example, if you select “Use Nintendo Button Layout” and fire up The Witcher 3, the physical A-button will make you jump, though the game will use the B-button prompt on screen to indicate “Jump” (B is the jump button in that game on a standard Xbox controller).
Nintendo Button Layout just sees the Steam Deck swap these buttons internally, which can be a little confusing game-to-game.
Try out different on-screen keyboards
Under “Keyboard” in the Settings, you’ll find a few different keyboard themes. You can even get some more themes via Steam Points, which you’ll earn by buying games.
Note: If you’re not connected to the internet, your Deck will default to the base keyboard theme.
Use R1 + Steam to take a screenshot (plus other useful shortcuts)
Like many gaming consoles, the Steam Deck has a handy way to take screenshots, but it’s not obvious. Simply hit R1 + Steam and you’ll take a screenshot. To find those screenshots, hit the Steam button and navigate to Media.
Note: While R1 + Steam is a very quick way to take a screenshot, there are two things to consider. If, for example, you’re playing a game where R1 is a melee attack, taking a screenshot will trigger the melee attack — which may or may not be seen in the screenshot. Also, if you take a screenshot while the notification for taking a previous screenshot is still active, your image will have the notification. If you want to hide screenshot notifications, switch on “Disable non-critical notifications” or “Hide non-critical notifications when in game” in the Notifications settings, which you can access by hitting the Steam button.
Sadly, you can’t customise these shortcuts right now. Holding the Steam button will show you a screen with all important screenshots. Here are a couple to commit to memory:
Device Functionality
Screen brightness: Steam + Up or Down on Left Analogue Stick
Force Game Shutdown: Steam + B (long press)
Show Keyboard (on Desktop Mode): Steam + X (launches after release)
Keyboard Keys
Enter Key: Steam + Right D-Pad
Tab Key: Steam + Down D-Pad
Escape Key: Steam + Left D-Pad
Get the most out of your home screen
The home screen on the Steam Deck might lack some much-needed customisation features, but aside from the main row of recently-played titles, scroll down a bit and you’ll get a quick summary of recently updated games and apps. Further down, you can get a sense of what games your friends are playing.
But hit R1 twice on your home screen and you’ll be taken to the Recommended tab. Here you can launch the Discovery Queue. If you’re new to Steam, this is a great way to find games that might suit your taste. You can quickly wishlist, or visit the store page of any game on there.
Just below the Discovery Queue, however, you’ll notice a section called “Play next from your library.” Your Deck will highlight games you haven’t yet played, lining up a queue of titles for games you already own. For some of us, that might be half our libraries. But it’s a nice way to have the Deck suggest something new that you already own.
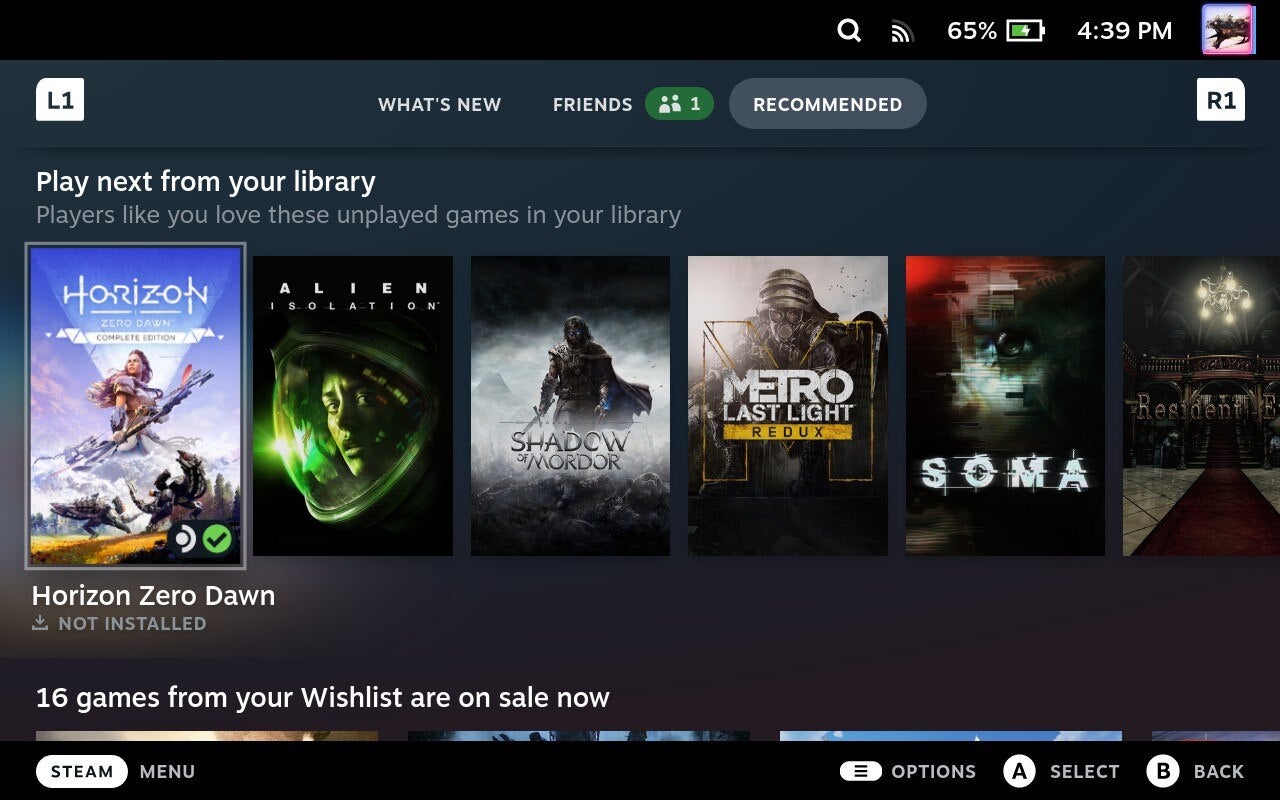
Further down on the home screen, you’ll see a selection of games that you’ve wishlisted and are currently on sale. So if you’re looking to save some cash on a game that caught your eye previously, this is a good place to check often.
Check your installed games and sort your library into collections
If you hit the Steam button and navigate to Library, you’ll get a series of tabs starting with “Great On Deck.” This page lists all the games in your library which are verified by Valve to work well on the Deck. There are a lot of great games on the Steam Deck, but this is a handy way of seeing what you already own that’s expected to run well. You can also navigate to “Installed” for a quick overview of what’s taking up space on your Deck.
Beyond this, you can sort your games manually in two different ways: Favourites and Collections. By hitting the Sandwich button (the three lines stacked vertically, listed as Options on the Deck’s UI) on a specific game, you can either send it to your favourites (a good way to keep track of games you’re currently working on) or you can create custom Collections based on genre, year, developer, or however you’d like to sort it.
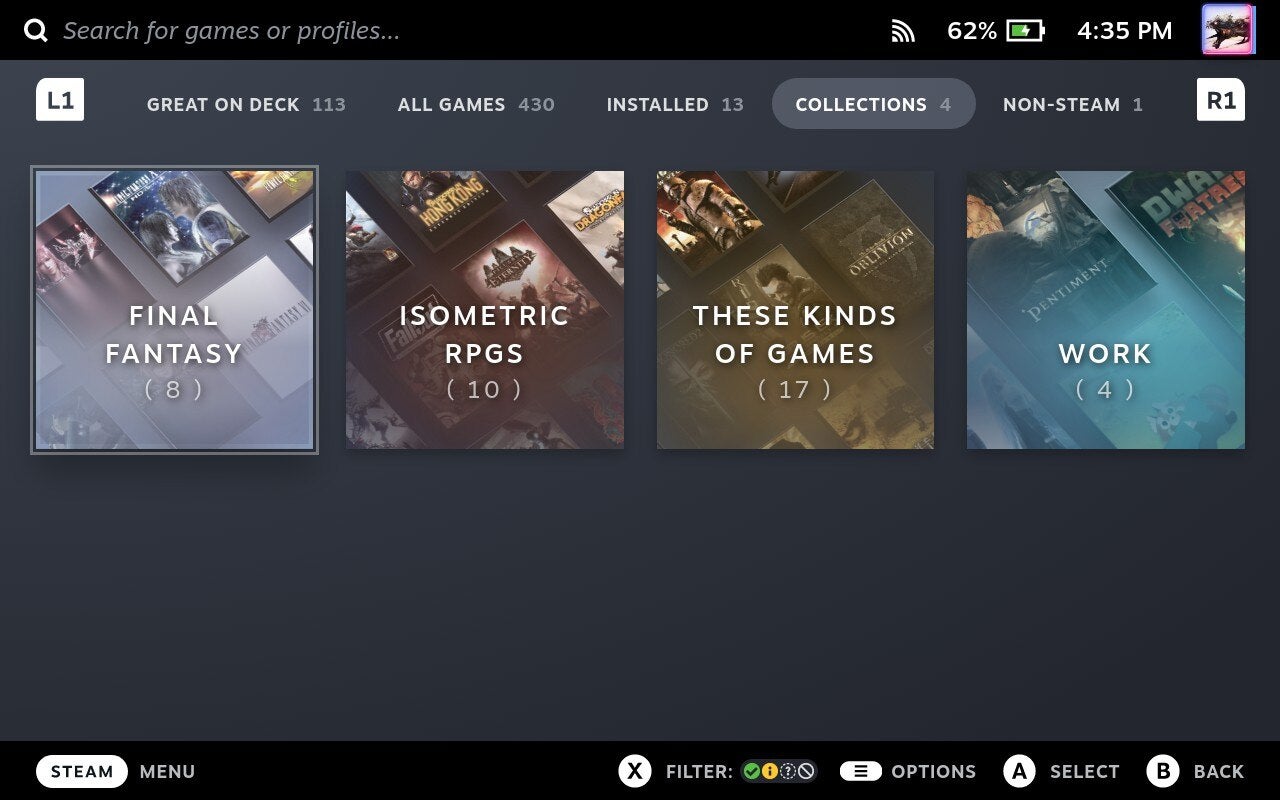
If you’re a Steam veteran, you likely have a large library on the platform. Collections will also appear on Steam’s desktop client, so it’s a great way to sort and navigate your growing digital library.
Learn to use the performance overlay to your advantage
If you’re coming to the Steam Deck from a console background, good news! The Deck will often just feel like using any console when it comes to launching and playing games. However, the Deck truly is a PC in a console form factor, which can mean some roadbumps when it comes to playing older titles (as it often does on a fully-fledged PC). But it also affords you some advantages, namely when it comes to getting your games to play the best.
The performance overlay is a pretty handy set of tools and you don’t need a degree in computer science to make use of it. The first, and most simple, is learning to use the framerate counter, as this will help you dial in the perfect settings for your games.
On the right-hand side of the Deck, you’ll find the “…” menu. Valve calls this the “Quick Settings” button. I call it the ellipsis button. Forgive me, I’m a recovering English major.
Under the Battery icon, you’ll see the Performance menu. Move the Performance Overlay Level to the first position on the slider to get a simple number that shows how many frames-per-second your game is getting.
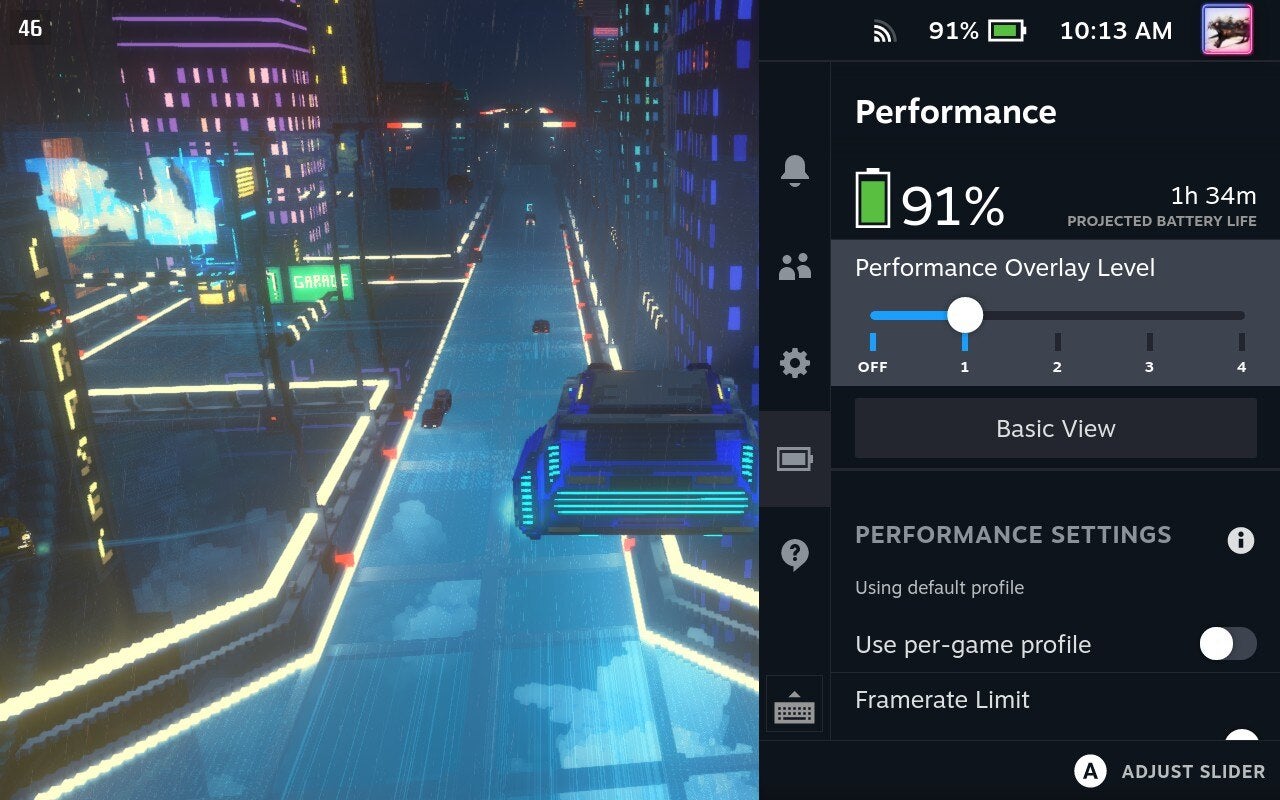
If you’re new to counting frame rates, generally the higher that number, the better your game will run. Granted, there are different settings to consider like resolution and specific graphical options, but if a game isn’t looking or playing the way you want, the first thing to check is how many frames your game is hitting. Generally speaking, anything 30 frames and above will do the job, but you also want to make sure that average number is relatively stable. The Deck can’t exceed 60 frames per second.
Learn how to dial in the right graphics settings for the best performance
Every game on PC and Steam Deck is different, so graphics settings are often best determined on a case-by-case basis. If you’re new to tweaking graphics settings, however, here are three broad steps to take if a game isn’t performing well (and is otherwise Verified or of Playable status).
1. Check if there’s a per-game performance profile
Hit the Quick Access button while running a game, navigate to the Battery Icon and under “Performance Settings” you may see a “use per-game profile.” One such game that offers this is The Witcher 3: Wild Hunt. If you see this option, you likely won’t need to adjust much beyond accepting this setting. The game will likely run just fine.
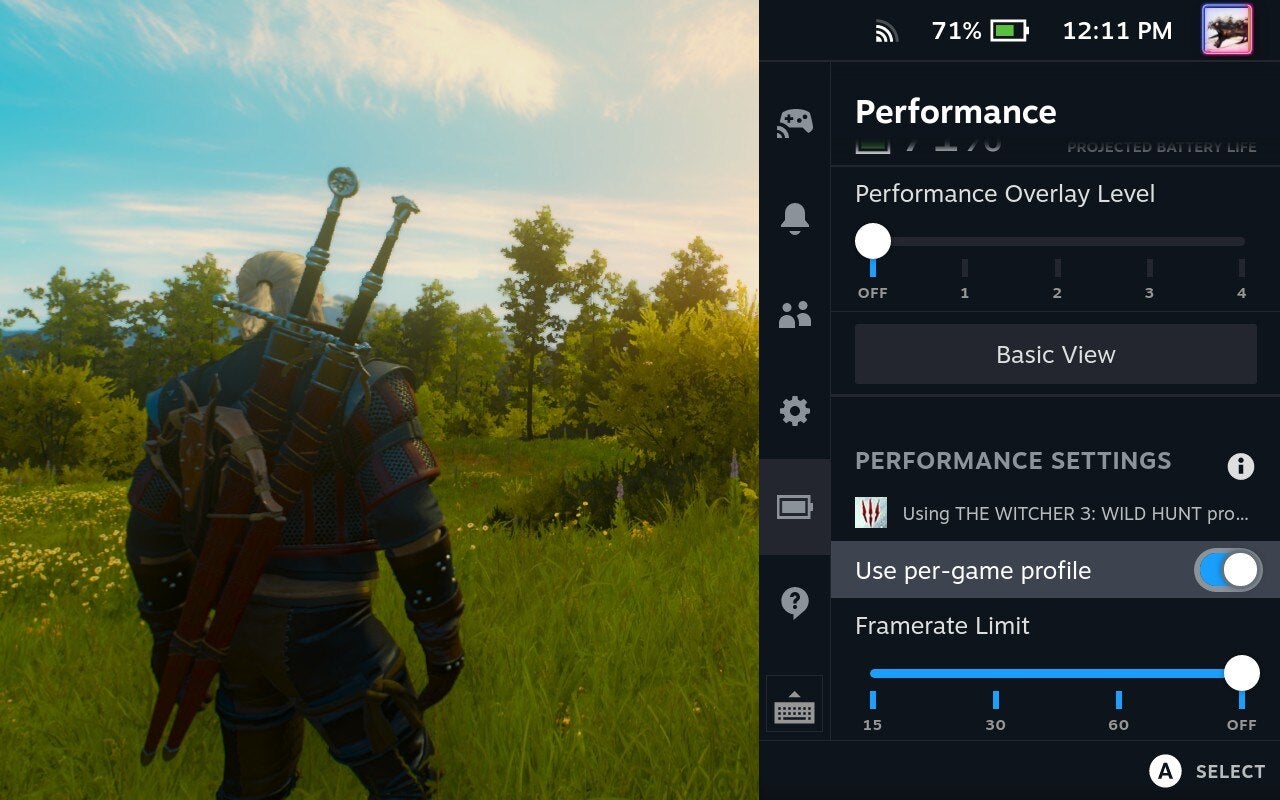
Note: In order to access this section, you’ll need to select “Advanced View” under the Performance Overlay Level slider in Quick Settings. Advanced View shows various performance settings such as Framerate Limit, Refresh Rate, and options to toggle on-screen tearing or half-rate shading, among others
2. Adjust other Quick Settings
Using the frame-rate counter I mentioned above as the metric for good performance (you’re looking to hit a relatively stable number somewhere between 30 and 60, on average), you could consider dialling back the framerate limit in the Performance menu of Quick Settings. This is a slider that stops at 15, 30, 60, and Off (sometimes called “uncapped” in PC gaming spaces).
If you’re fluctuating wildly between 30 and 60, move that slider to 30. You can also lower the Refresh Rate of the screen between 40 and 60. This changes the actual rate that the screen refreshes itself (because all moving images are an illusion of several still images running in order), but for that feature to work best, you’ll want to be sure that V-Sync is running in the game’s own settings.
Other settings such as Allow Tearing, Half Rate Shading, and Manual GPU Clock Control are best untouched if you don’t understand what these do. We’ll cover those another time.
3. Change key settings within the game itself
Every game is different, so a universal set of tips for graphics settings is tricky, but here are the ones you should look out for if you’re new to PC gaming:
Resolution: The Steam Deck’s screen is a native 1280×800 resolution. You’ll want to make sure that your game matches this resolution and isn’t above or below this number.
Shadow quality: Different games are going to have different settings for shadows, so this will vary wildly. However, one of the first places to consider dialling back the settings to improve performance is shadow settings.
Many modern games have a variety of settings for shadows. Dialling these back to a “Medium” setting will often save a number of frames.
Motion blur, chromatic aberration, film grain, etc.: These are often ugly words in PC gaming. I, personally, like a good application of chromatic aberration and film grain. The key words there are “good application.” It’s often an effect, as is motion blur and film grain, that can muddy up the image, particularly when on a small screen like the Steam Deck. While it might not result in a boost to performance (though sometimes it can) it can clean up the image.
For example, I happen to like using film grain and chromatic aberration in Cyberpunk 2077 on a desktop PC (sue me). I find it adds a nice layer of texture and depth to the image. But when playing on the Deck, I’ll shut this setting off for 2077 as it just doesn’t translate to a small screen so well.
This doesn’t even scratch the surface of graphics settings, but they are good places to start if you’re new to tweaking such options. Honestly, when in doubt, doing a quick Google of “best Steam Deck settings for X game” is often a good way to see what’s worked for other users.
Check how much time your battery has left
To see how much time you have available on your battery, hit the Quick Settings button and navigate down to the battery icon. Enable the Advanced View and scroll down to
Diagnostics. The key readouts here are your battery’s current capacity and its time to empty.
As similar functions on laptops and smartphones work, your battery’s “time to empty” is an estimate at best and might not always fully line up with the amount of time you’ll actually get, but the Deck is usually fairly accurate in this regard.
The Steam Deck is a wildly impressive and powerful machine, especially considering that it’s secretly a Linux-based operating system stealthily tricking your Steam games into thinking they’re running on Windows. Most of the time, you’ll have a great gaming experience on the Deck, but these tips will help you tailor the experience a bit more and get a handle on some more unwieldy games.
Leave a Reply