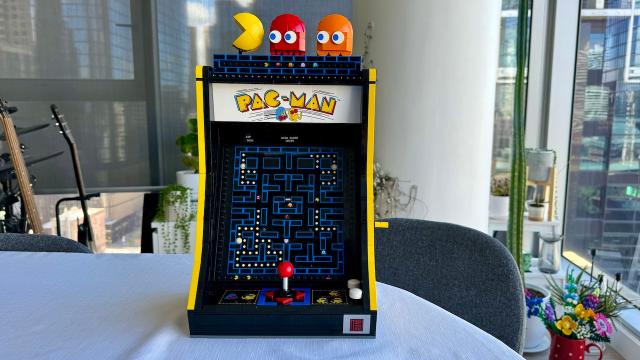
Pac-Man is everyone’s favourite pill-gobbling pizza, haunted by ghosts (Editor’s note: He’s just like me fr — David). So it’s no surprise that Lego has immortalised the character in bricks. Looking at the box, you’d think that this Lego Pac-Man Arcade set was to build an arcade cabinet, which is an accurate assumption. But the box also gives you two incorrect assumptions: 1. That there is a battery inside that does something exciting. 2. It doesn’t move.
Aside from a fiddly middle stage and a sticker sheet that is now my mortal enemy, this Lego Pac-Man set was an extremely satisfying and enjoyable build. But, at $399.99 for just 2651 pieces, is it worth the inflated 16-ish cents per piece? I built it to find out.
What’s in the box? (Yes, you read that in the correct tone of voice)
In the box, you get a few Technic baseplates and extra pieces, a very thick instruction manual, 14 stages spread over 24 bags, and the dreaded sticker sheet.
On the box, it says that there is a battery inside, and for just a moment, I got my hopes up that that meant that the arcade machine contained a mechanical element that justified its price point. But then I remembered that components like the Lego Powered Up system don’t come with batteries. The only things in Lego boxes that usually come with their own batteries are light-up bricks. And, sure enough, there is a light brick that gets used in a delightful way later. Not as high-tech as some may have hoped, but still a really nice touch.
The instructions start off with the usual little story about how the collaboration came to be, who the designers are, and a bit about the history of Pac-Man. I really like these sections of the collaboration manuals because I always learn something new. For example: The yellow colour of Pac-Man was inspired by Lego’s signature colour, making this whole thing seem like it’s coming full circle (unlike Pac-Man himself).
First things first
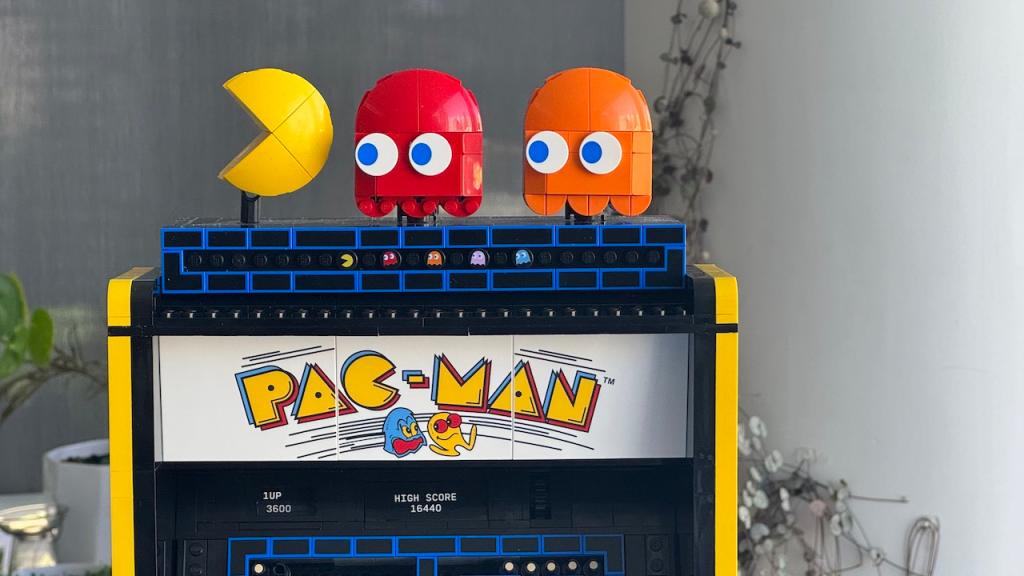
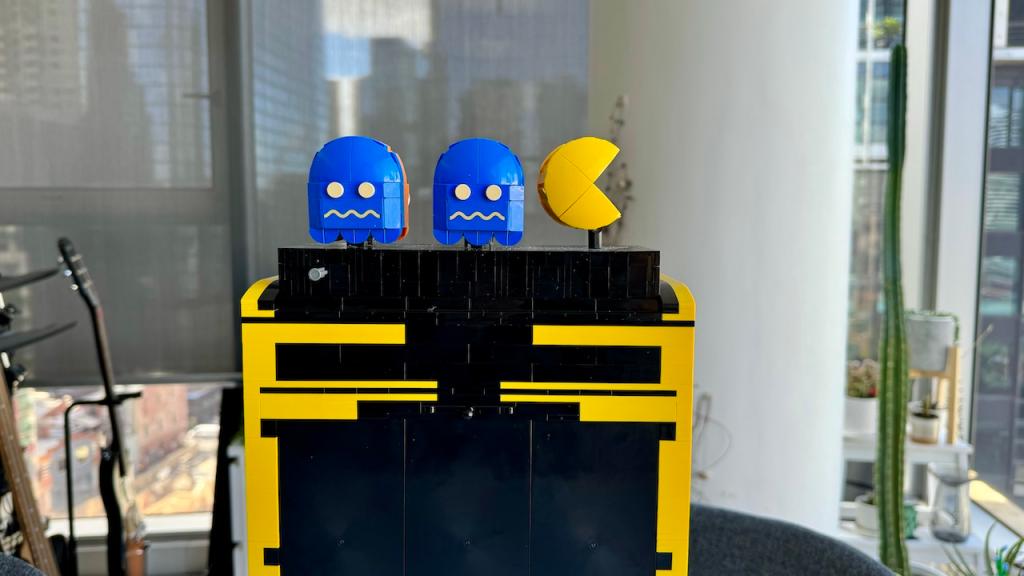
The first thing you construct is the topper for the arcade machine, and this might just be my favourite part of the whole build.
You start by building a little box followed by a cog mechanism. What I liked about this was that you also build a little tool to keep the cogs in place. Lego doesn’t always do this, and I’ve had many frustrating builds where the cogs just didn’t line up, and I had a horrible time. With this little tool, I found the whole experience much more pleasant. Plus, the pieces from the tool become useful in a later step.
The cogs are to make it so you can press in a little axle at the back and have Blinky the ghost and Pac-Man flip over, with the regular coloured ghosts chasing Pac-Man one way and the blue-coloured ghosts being chased the other way.
The builds for Pac-Man, Blinky and Clyde clearly borrow a lot from BrickHeadz, so if you’ve built a couple of sets from the BrickHeadz collection, then it’ll be a familiar process.
In addition to the characters, I enjoyed many other little details in this section, like all the printed tiles for the decoration around the edge and the little printed characters. As always with Lego, you get extras of the tiniest bits, so you’ll have extra character tiles you can use in other builds or display pieces.
I really loved this portion of the build, and I hope Lego makes more sets like it in the future.
Making the arcade cabinet itself

Next up, you build the base of the cabinet, including placing the light-up brick with a little mechanism to press the button. The brick ends up lighting a “coin slot”, which is a particularly lovely touch. At this same part, you also use rubber to make the base of a joystick.
Unfortunately, the base of the cabinet is also quite sticker heavy, and due to my inability to do anything straight no matter how hard I try, the whole thing just looks a little off. Given how expensive this set is, I really think Lego could have sprung for a few more printed tiles to get a better effect (though, as we will learn later, even that is not fool proof).
After that, I built the walls of the cabinet. They’re surprisingly thick, but that allows the later stickered tiles to sit flat in the walls, which I appreciated. The walls also need to be nice and solid because they, along with some bracing parts in the middle, will be the main things that hold the whole thing together – the middle is a bit more of a delicate mechanism (which we’ll get to in a minute).
There’s nothing especially exciting about the walls – they’re walls. But for some reason, I really enjoyed building them. Very chill.
The Mechanism
You might remember that on the Lego NES set, there was a mechanism that allowed you to turn a crank and have Mario “move” through a level. The Pac-Man set has a similar mechanism, but it’s more Pac-Man appropriate, and far fiddlier.
It’s an absolutely genius solution to the problem of making a game look like it’s being played on a screen, when you have no powered functions.
The “secret” is several hundred technic parts, some tank treads/chain with bar attachments., and a whole bunch of carefully placed cogs.
I loved the challenge of building this section and seeing it come to life. But I would be lying if I said that it wasn’t frustrating and monotonous at times. You have to be precise, and it’s easy to bump something and put your work back a few steps. Building with Technic is not like building with Lego. It’s like baking vs cooking. Lego and cooking mean that the recipe is like a guideline, but you’re able to freestyle if you make a mistake or thing something might be better in a different way. Technic and baking need to be perfect, or everything is ruined. I didn’t make any major mistakes during this part, but if you find Technic stressful rather than restful, then this might not be for you.
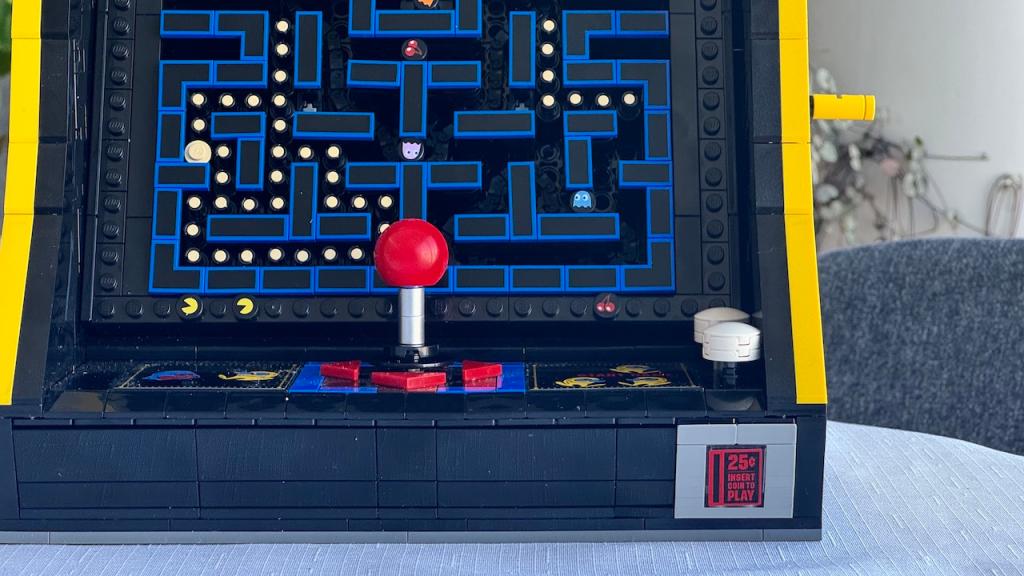
While there is a lot of repetition, there is also a kind of magic to seeing it form. You just trust the designer that it’s going to work, but there were times there when I wasn’t sure the build was going to turn out properly. It was kinda exciting, in a way. Once the maze emerged with the little pellets everywhere, you could see how much engineering genius had gone into it.
I’m being a bit vague because I don’t want to spoil the process for you too much. Just trust me that it’s going to be fiddly, precise, frustrating, boring, exciting and interesting, sometimes all at once, but it’s really cool when it comes together.
The part where you have to turn it over and put things on the back was a bit stressful, because I was worried I was going to break the front parts, but it was a lot more solid than I expected, which was a nice surprise.
There’s also a score wheel that you can turn to change the score. Sadly, the scores are stickers, and almost impossible to place perfectly on this kind of round brick, so, good luck with that. But it adds to the charm, I guess. God is in the details, love is in the imperfections, and all that.
Putting the “screen” into its slot and then clipping it onto the parts I placed when I built the walls was a cool moment. A cooler moment was being able to turn the crank and see Pac-Man move around the maze smoothly and cleanly, making that whole part of the process worth it.
The rest of the body of the cabinet in the Lego Pac-Man Arcade
After the screen is done, you build the top of the cabinet, which includes three printed tiles for the Pac-Man sign at the top. While I greatly appreciate that these tiles were printed rather than stickers, the spacing on the printing, and the way it’s broken up in the placement of the tiles, doesn’t look as clean as I would like. There’s too much of a gap on the second “A”. It would have been better to do two tiles rather than three, to put the break between “Pac” and “Man” I don’t mind if a hyphen is split, I do mind if the letters look misplaced.
But that’s just nit-picking at that point (please print more tiles and give fewer stickers, I will still complain, but slightly less).
I like the back quite a bit. I had expected it to be a solid build like the walls, but it’s actually a door (hence why the walls are so extra reenforced, I guess). The back is removable so it can hide a secret build. You could also hide candy or other more illicit items, I guess.
To put the cherry on top, you build the joystick and add it on. Weird it wasn’t added with all the other controls earlier on in the build, but maybe that’s because it would have gotten in the way of placing the screen? Or, perhaps the designers love a spot of dramatic flair as much as I do.
The extra, secret bit of the Lego Pac-Man arcade
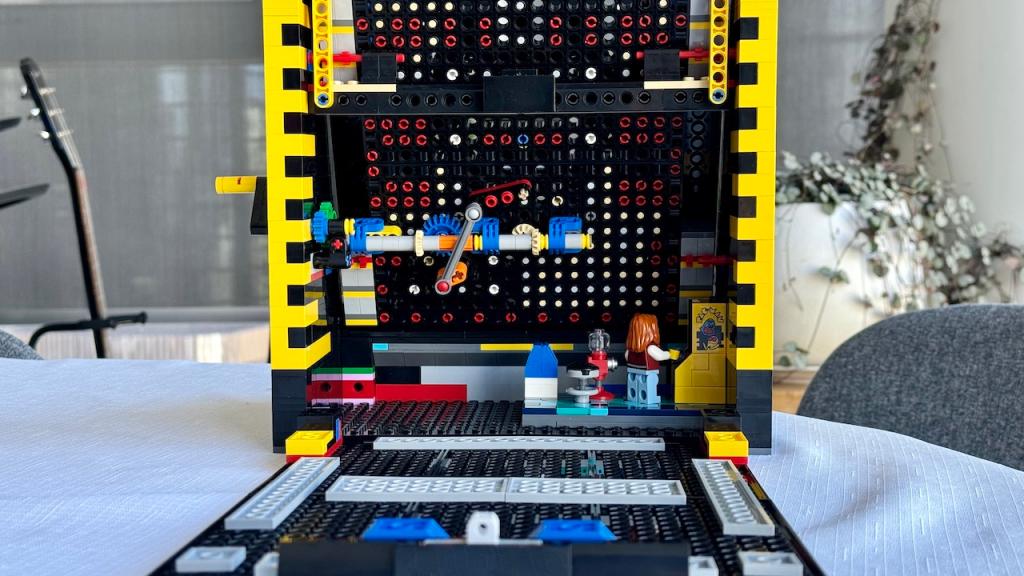
In addition to making the big Pac-Man Arcade unit, you also make a minifig scale version, in an arcade complete with a bubble-gum machine and rubbish bin.
It’s a nice little mini build that you can hide in the back of the arcade machine. It is missing a few things, though: I don’t know why the bubble-gum machine is empty. Surely Lego has at least one printed element that could have gone inside? I would have preferred that to the rubbish bin.
But the little machine, and the minifig are cute, and I like the effort that’s gone into making the carpet look ugly enough to belong in a vintage arcade.
Final verdict of the Lego Pac-Man Arcade
I really love the finished product of the Lego Pac-Man Arcade. It’s a fun display piece with some practical elements that add some joy and whimsy. It’s clearly been a labour of love for the designers, and there are some really cool design choices here.
I am disappointed that it’s so expensive for what it is. $399.99 is a bit much for this many pieces. But if you can find it on a good discount, this is a set that even casual fans of arcade games in general would likely enjoy having on their shelves.
Leave a Reply