
I recently celebrated a birthday and decided that I wanted a gaming-themed cake because it seemed like a fun thing to do. Friends had suggested I just make a cake that depicted malaria from Far Cry 2, although the thought of baking syringes into chocolate sponge didn’t appeal. So I decided to live less dangerously and bake more blockily: I made a Minecraft cake!
STEP 1: GATHER YOUR INGREDIENTS!
Monsieur Blob of de Blob fame asked to assist in the baking of this cake, and I said yes on the condition that he didn’t touch anything.
I actually failed at this step because not all the ingredients I used appear in this photo. For example, I forgot that I needed eggs. I later procured some eggs, but the chance to photograph them had passed, so there will be no photogenic eggs for anyone today.

INGREDIENTS FOR THE CAKE
[Note: the quantities listed here are for a one-tiered Minecraft cake, i.e. a chocolate cake with a layer of green icing. If you want to build up your landscape, you’ll need to double the ingredients and bake two sponge cakes (which I did!)]1 ⅓ cups of plain flour (you may use wholemeal flour if you wish to stay regular at all times)
2 tbs of cocoa powder (I may have used four because je suis fat fat)
1 tsp baking powder
220g unsalted butter, softened, chopped
1 tsp vanilla extract (this is basically the same thing as vanilla essence)
4 eggs
1 cup of sugar (the normal stuff you use in tea and coffee)
ICING
1 cup icing sugar (the powdery stuff that looks like chalk)
100 grams of butter
A few drops of food colouring
3 tbs of desiccated coconut
STEP 2: DUMP SOME STUFF INTO A BOWL
Dump sugar (the normal stuff, not the chalk stuff) onto chopped chunks of butter. Using a handheld electric mixer, or your fists, combine the two until you get a creamy consistency (it should be smooth).

STEP 3: MIX THINGS
Add your flour, baking powder, cocoa (as you can see, I clearly used more than the recommended two tablespoons), and the eggs. Now mix, mix, mix! A word of warning: the handheld mixer will probably make some of the ingredients fly everywhere, so you might want to wear a raincoat. Or an apron.

STEP 4: MAKE A CHOCOLATE BLOB
Your mixture should look like… you know in that episode of Captain Planet where the bad guys decide that the best way to dispose of trash is to zap it with a laser so that it turns into a purple blob that resembles the Pokemon Ditto? Your mixture should look like that, except brown. If you haven’t seen that episode of Captain Planet, you should refer to the image below.

STEP 5: BAKE IT ON YOUR OWN TERMS
Pour the mixture into a square cake tin that has been lined with baking paper. Preheat your oven to 180 c degrees and bake the cake for around 30 minutes. You will know it is ready when you prod the centre with a skewer and it comes out clean. If you’ve chosen to make two sponge cakes (like I did), you can either fill a second cake tin or wait until the first cake is done before baking the second. Whatevz, man. Live by your own rules. Bake the way you want to. Party on your own terms!

STEP 6: ICE ICE BABY
While the cake is baking, mix the icing sugar with butter until it reaches this consistency, and then add a few drops of food colouring.

After a bit of beating, your icing should look like this poisonous shade of green.

STEP 7: DYE SOME COCONUT BITS
To mimic the texture of video game grass, add a few drops of food colouring to a bowl of desiccated coconut and mix thoroughly. The coconut will be sprinkled over the cake at a later stage.

STEP 8: ICE IT! DO IT NOW! PULL THE TRIGGER!
Oh hey, the cake is ready! Oh man, I am so clever. Allow the cake to cool (I did not take my own advice and began icing the cake after five minutes. I was then surprised when my icing began to melt and my cake started to fall apart. I suppose I am not so clever after all). If you want, you can cut the edges to make the cake look more “blocky”, although make sure the cake has cooled down before doing this otherwise it will crumble and break (I would know, because I did it, and… oh man, I am not clever at all).

STEP 9: BUILD A THING!
With the first cake iced, cut up the second cake into smaller squares and stack them on top, then ice those pieces and sprinkle some of the desiccated coconut over the top. “But Tracey!” you say, interrupting me as I write this post. “We’re not meant to be able to see the grass between dirt blocks in Minecraft! You’re doing it wrong!” Yeah, well, look, fine. FINE. I am clearly not doing a very good job at making this cake. But if I didn’t ice between layers then the sponge wouldn’t stick, and then EVERYTHING would fall apart, and then people would make fun of me even more.

See? Even Blob is lolling. What a jerk!

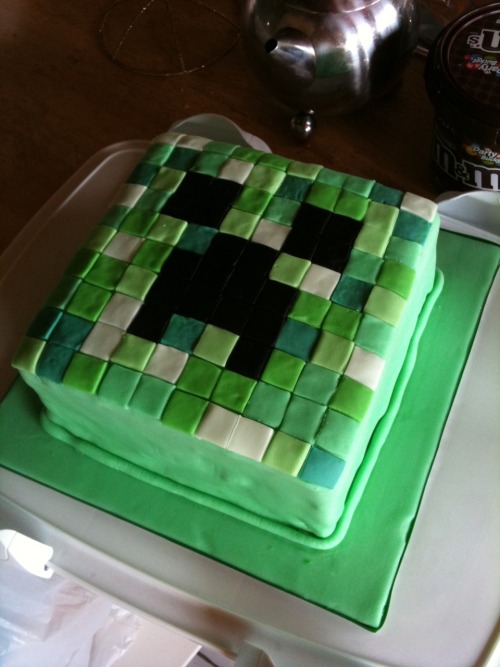
STEP 10: CAKE
Tadaaaa!

Here are some hot tips that I wish I had known prior to making this cake:
* Allow all the sponge cake to cool down completely before doing anything with it, this includes cutting, icing, moving, and even eating
* The cake recipe can be substituted with pretty much any other kind of sponge cake recipe
* The cake will keep for around 3 days after baking, and actually tastes better the next day
* Kotaku and all its editors, writers, and publishers cannot be held responsible if you get diabetes, obesity or a stroke after consuming this cake. We are also not liable if you choke on a piece of cake or accidentally dye your kitchen green
Leave a Reply